
| WWT Shows | CLICK TO: Join and Support Internet Horology Club 185™ | IHC185™ Forums |

|
• Check Out Our... • • TWO Book Offer! • |
Welcome Aboard IHC185™  Internet Horology Club 185 IHC185™ Discussion Site Main Page Horological Discussions, Questions and Answers Pocket Watch Discussions Hamilton 932 Dial Repairs
Horological Discussions, Questions and Answers Pocket Watch Discussions Page 1 2
Go | New Topic | Find-Or-Search | Notify | Tools | Reply to Post |
| IHC Life Member |
Hello All I recently received my Hamilton 932 back from a dial repair. Lindell has done this work for me and the results are outstanding. Lindell gives 110 percent of himself to this hobby and to IHC 185. I cannot the express my gratitude enough for his help and dedication to us newcomers. I only hope someday to be able to repay him for his generous ways. Now to show the repaired dial. I can't believe this is the same dial. Doug 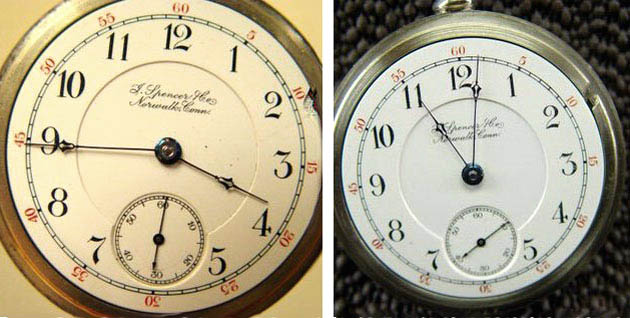 | ||
|
| IHC President Life Member |
Everyone, The method I use is non-invasive and can easily be reversed. It involves ordinary wall spackling which comes in a small container and was intended to fill marks and nail holes in plaster walls. Since dials under the final porcelain-enamel finish are of material similar to plaster I came up with the idea of using spackle. Doug's dial had a large chunk out of it by the lever which we find on some Hamilton 18-size watches. First I removed the dial and thoroughly cleaned it using the Comet Bathroom Cleaner as recommended in "Porcelain-Enamel Dial Cleaning" and dried it with a hair dryer on the "low heat" setting. Then I placed my first coat of spackle into the depression. When dry I carefully leveled it, followed by several more ever-so-slight fillings. That was then smoothed with a single-edge razor blade and wiped clean. When I was satisfied with the filling operation and that it was completely dry, I began to apply thin coats of "Duro Porcelain Appliance Touch-Up" to have a smooth white porcelain-like surface. Between each coat I polished the surface of the repair to smoothness with Simichrome polish. Days later, when it was finally the way I wanted it to look another polish with Simichome and the entire dial polished with Meguiar's Mirror Glaze Plexigas Cleaner. The finished product is smooth and the repaired area blends into the dial rather well. It is good to make proper improvements and upgrades but we must do them carefully and also weigh the implications. And so, a word of caution, before trying my repair method on a worthwhile dial try it more than once on a dial of no real value. I was glad to help improve Doug's and make it a greater pleasure for him. Thank you Doug, I'll try to be worthy of your kind words. Lindell | |||
|
| IHC Life Member |
Here are closeup pictures. I have tried to show as close as possible the changes in this dial. I am sorry for the color differences but I have installed a new light source that is more true. I hope this gives you a better idea of the quality of Lindell's repair. I think nor would I say this is a repair that will hold up forever. However at this time in history it does display the watch as it once was. As long as I admit that a repair has been done (and I would) there is nothing wrong. Lindell has done a beautiful job, love this watch, Hamilton 932 movement number 229 very much and want to display it in as close as possible to orginal. Thanks, Doug 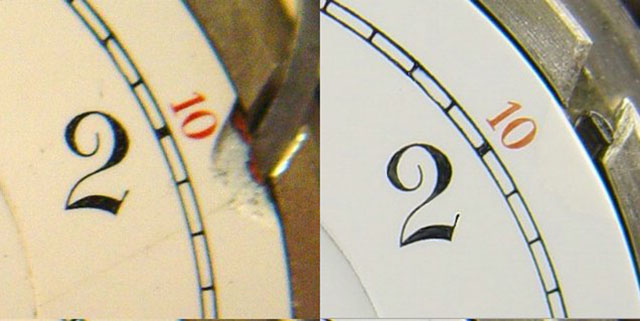 | |||
|
Thanks Lin for sharing your technique and thanks to Doug for starting this topic. He is obviously happy with the results and, by posting, shows there is no intent to decieve. Ron | ||||
|
Nice job Lindell | ||||
|
| IHC Life Member |
Nice job I have never heard of useing spackling but it looks great. What is your secret to cleaning a dial I have heard many ways even to the point of ultra sonic cleaner but I have also been told that might damage it worse. Can't even see the hairline!! | |||
|
| IHC President Life Member |
Thanks! If you look really close at the "after" there is a slight difference in the filling. Not unlike a dentist filling in a chipped front tooth. My promise to Doug was that he would not see any problem with the bezel in place. And since I didn't charge him for it he gets my double your money back guarantee of total satisfaction. But seriously Rob, you would be taking a big risk using an ultrasonic machine to clean dials. Here is the topic where we got into dial cleaning pros and cons as well as specific product recommendations last year... TOPIC: "Porcelain-Enamel Dial Cleaning" By the way in an eMail I was asked about the brand of spackle. I used "Custom Building Products All Purpose Spackling Paste" marked as "Indoor-Outdoor" in a small 8 ounce tub. That is from a local honest-to-goodness real hardware store. Hope this helps. | |||
|
Very impressive, Lindell! Cheers! Joel | ||||
|
The close-up photos are even more spectacular than the originals. I am MOST impressed. I have used the appliance paint but, as you know, it tends to dry with a noticeable depression, even if you put a big gob in the chip. One question.... if you are leveling the Spackle to the dial surface... doesn't the touch-up paint tend to sit up on top of it? How do you get everything to be so level? IMO, that's 75% of the problem... getting everything at the same level. | ||||
|
| IHC President Life Member |
Thanks! The firm, level surface of the spackle is vital to this method working well. Interestingly, the appliance touch-up can be worked into the spackle. I spread it on, wipe off the excess and let it dry for several days between applications. Then I polish it and when I'm satisfied with the "look" I learned to quit while I'm ahead. Remember, this can always be removed if a better method comes along someday. As you can see, Doug's dial is improved dramatically. By the way his "after" pictures are very bright. I assure you the cleaning did not fade his dial, the red five minute outer trach and all the markings are as bright as ever. The hairlines are no longer noticeable and that big chunk is no longer missing. This should work from a dial chip up to even major dial repair projects. Here is the watch when Doug purchased it... TOPIC: Hamilton 932 Questions by Douglas Addy You will see how that chunk out of Doug's dial really detracted in the "before" images. Lindell | |||
|
| IHC Life Member |
Lindell When you had the dial off this watch did you notice if the watch was 16 or 17 jewels. I have heard speculation about these watches actualy being 17 jewels. Just thought I would ask. Doug | |||
|
| IHC Member 163 |
Lindell, have you ever given thought to doing this for a living? I have a Ball 18s dial that could use this kind of TLC. (grins) BEAUTIFUL job!! Regard! Mark | |||
|
I seriously doubt that your 932 is 17 Jewels. As I recall, Doug... your watch was at the beginning of the run (very, very early) and, therefore, would have been 16J. (and you'd want it that way). | ||||
|
 |
Lindell, that is masterly work! Beyond excellant! Sam Williamson | |||
|
| IHC President Life Member |
Thanks Sam, By the way Doug's 932 is positively a 16-Jewel, I remember it very clearly. Lindell | |||
|
I was going to say that this technique is really a fresco. I looked up the technique and learned that a fresco is done on fresh wet plaster. You painted on dry plaster, so it is "a secco". Still I think Michealangelo would approve. I don't know if your watch will end up in a museum in one or two hundred years. Of course, they would know it was a repair, but was it a repair done at the time the watch was commonly used or a hundred years later? I know of an outstanding carpenter and wood carver who restored the case on a very nice tall case clock. He recently saw the clock in a high end auction advertised as all original. He could not convince them that he had rebuild the whole left side of the hood including the carvings. He had to show them his original drawings to convince them. He did the right thing and they then did the right thing by correcting their claim. Don | ||||
|
| IHC President Life Member |
Many collectors keep carefully prepared documentation with their watches to explain these kinds of things along with any and all upgrades or replacement parts they are aware of. Some folks do such entries as this in a book that is passed along to the new owner when they sell a collector car, a good idea with any collectible item. Whether it all stays together over time is anybody's guess. Make it a rule to always be observant, examine very carefully prior to purchase. | |||
|
I worked on a dial today, another Hamilton "contract" dial that matched the movement. This dial will look fine with the bezel on... but it is no where near the almost invisible repairs that Lindell can do. But... I'm learning more all the time and I'm convinced that when my "rookie" errors are eliminated, that this will be a good repair process. Is anyone doing this besides Lindell and me? This process requires only a razor and materials from any hardware store (cost is under $10.00). A wearable Loupe is also a good idea. | ||||
|
Lindell, It's taking me awhile to catch up on all the good information in the archives, but that is really one great looking dial repair job. Bob | ||||
|
| IHC Life Member |
I bought this nice old Rolex last year and have recently been developing my skills at dial repair. I have found that just as difficult as getting the repair flat, is the problem of getting a proper shade of white. I tried Krylon appliance touch up, Rustoleum appliance touch up, white epoxy spray paint, two different samples of white nail polish, etc. Another problem I ran into was the hardness of the dried paint. The nail polish that had the closest match to the white of the dial, turned out to not be very hard when dry. That made it harder to sand and harder to polish. Anyway, I used Lindell's spackle undercoat process and things went well with the filling and polish. The main topic of my discussion has to do with a technique I came up with to deal with the double-rail minutes track that goes around the outer edge. Repairs get a lot more difficult when you have to put graphics back in. The following pictures will show how I was able to put back the minutes track on this dial. 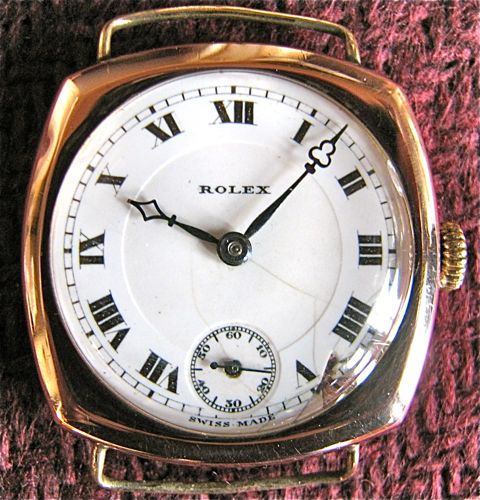 | |||
|
| IHC Life Member |
Here is a shot of the dial prior to filling with spackle and painting with the white nail polish.  | |||
|
| IHC Life Member |
This photo shows the filling and polish. As you can see, the color still wasn't just right. I corrected the situation just a bit by adding a dab of black nail polish to the white polish for the final coat. I also found out something else the hard way...during the polishing process, it is quite easy to fade some of the graphics lying close to the repair. Compare this shot with the previous photo to see what I mean...yuk! 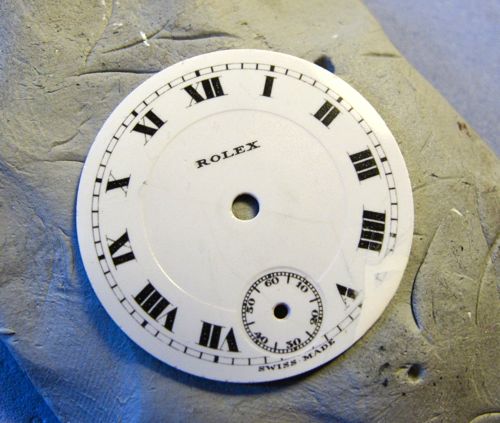 | |||
|
| IHC Life Member |
Now, for a very big problem. How do you draw two concentric lines and have the lines line-up at both sides and be no fatter than the existing lines on the dial. I decided the best way get the job done was to use a scrimshaw approach. I would scratch in the lines, then fill with either shoe polish or water soluable india ink. After having a nice gloss on the patch, using a coin as a template, I made my first attempt. This was going to be a one-shot deal...get it wrong, and you are back to repainting and polishing the patch. Like I said previously, starting out on the one side is easy, but hitting the line exactly at the other end is a super hard. Well, I didn't even come close 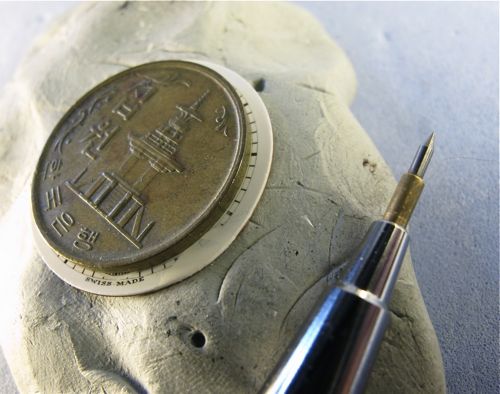 | |||
|
| IHC Life Member |
This photo is out of order, but this is where I was testing to see if very fine lines were possible with a scrimshaw approach.  | |||
|
| IHC Life Member |
This photo shows the final solution. I dug out my old compass set from high school mechanical drawing class. Using the compass with a needle point on each arm I was able to precisely scribe these two very difficult concentric curved lines. The finished repair is not as good as it could have been because I caused some fading of some of the graphics around repair when I was polishing the filled area. The IIII and IV needed touch up and I was a little sloppy with it, but when the paint dries I should be able to sharpen things up a bit by doing some judicious scraping. There are also some hairlines that refused to clean up prior to doing this repair. Hopefully, they will be less noticable when the watch goes back together. The one thing I am very happy with is my little railroad track that I was able to put back on the repaired area. 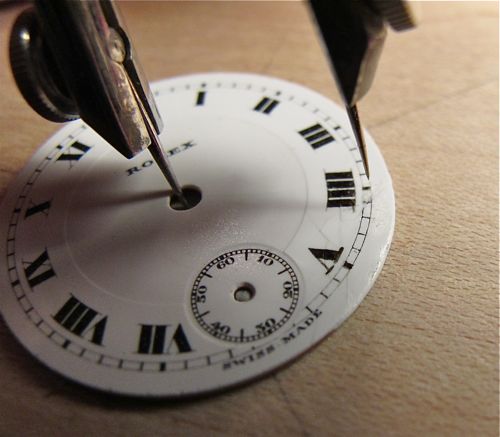 | |||
|
| IHC Life Member |
One final shot of the tool and the almost finished dial (still needs a little touch up). Note, the repair is between chapter 4 and 5. I'm not super happy with the final repair, but I learned a whole lot and hope future efforts turn out a lot better  | |||
|
IHC Member 1610 |
Lindell outstanding job! I can not say anything more that has not already been said. My hat is off to the master. | |||
|
| IHC President Life Member |
Thanks Harry, and I am so very pleased that Bruce was able to use my humble efforts as a basis for his amazing work. By the way, the member who started this topic Doug Addy passed away in September of 2011 and his kind comments you see above in this topic are a lasting tribute to our memory of him. Bruce, I am immensely impressed with your outstanding workmanship. Lindell | |||
|
| IHC Member 1610 |
Nice job Bruce and a great tip about the compass. | |||
|
Nice job thinking out of the box! Very ingenious method for replacing the RR tracks | ||||
|
| IHC Life Member |
In the process of scribing my "RR track" I chose to go with the black shoe polish option. Even though the black india ink worked great in test samples, I was worried that if I used it on this Rolex dial some of it may have been sucked into one of the nearby hairline cracks (that would have been really bad!). That was far less likely with the polish. One other note: it was critical that the one leg of the compass stay put when the compass pivoted to swing the arc, especially when the second line needed to be precisely parellel with the first line. To accomplish this, the right type of wood block needed to be used. I decided that maple was ideal because it doesn't have soft and hard striations of grain. It is also hard enough so the pivot hole would not distort before the second line was scribed. It is also necessary to bore two very precise holes for the dial feet to slide down into. Final shimming was done with some very thin pieces of Rodico...didn't want the dial to do any rocking at the wrong time. Hope someone else out there will find all of this useful. | |||
|
| Site Administrator IHC Life Member |
Bruce, very very well done and much appreciate the sharing with us. | |||
|
| IHC Vice President Pitfalls Moderator IHC Life Member |
Good going Bruce! Using the compass like that was brilliant. Best Regards, Ed | |||
|
| Powered by Social Strata | Page 1 2 |
| Your request is being processed... |
©2002-2025 Internet Horology Club 185™ - Lindell V. Riddle President - All Rights Reserved Worldwide
| View $GS_USERNAME's User Profile | |
| View Recent Posts by $GS_USERNAME | |
| Notify me of New Posts by $GS_USERNAME |