"Hi folks. I have completely stripped the movement, cleaned and oiled and am in the process of re-assembling but I just cannot work out how the mechanism for winding and setting the hands should look prior to putting the plate on. It's those two bits of metal with a "U" shaped spring. Would there be a picture anywhere?."
I have tried to help with this as the design was definetly a departure from what a "normal" gear head like us can easily figure out just looking at the parts.
My method is only how I learned to do this. I must add that often we each find a way to do it differently but successfully to avoid a complete nervous breakdown. I do hope the pictorial helps at least to see where the parts belong.
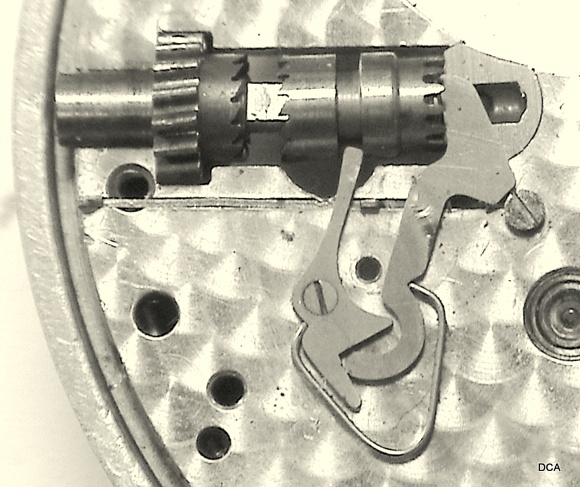
So we start with nomenclature and basic layout of the parts in question;
Posts: 6492 | Location: Southern California in the USA | Registered: July 19, 2007
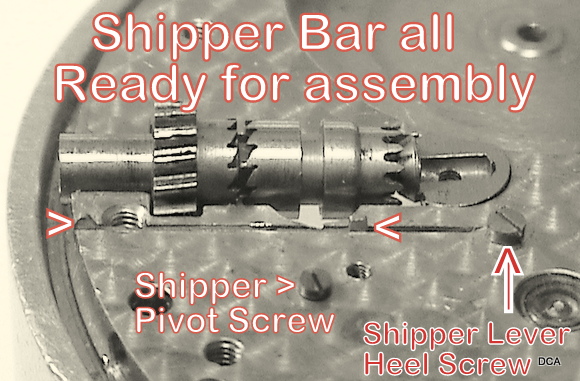
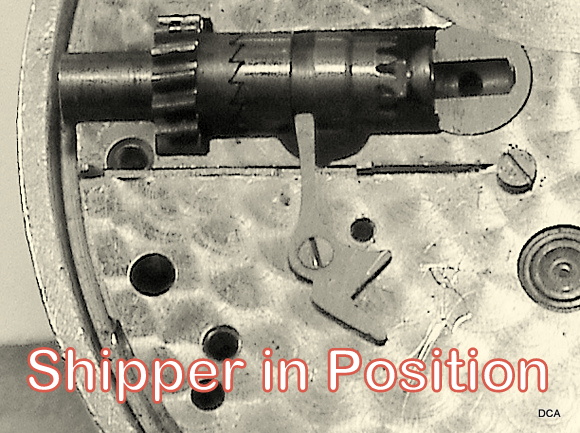
Before installing the wind and set parts make sure the Shipper Bar is placed in the dial plate slot with the tapered tip at the outward edge . . . Also note the identity of the two screws permanently affixed to the dial plate and necessary to facilitate the shipper parts.
Posts: 6492 | Location: Southern California in the USA | Registered: July 19, 2007
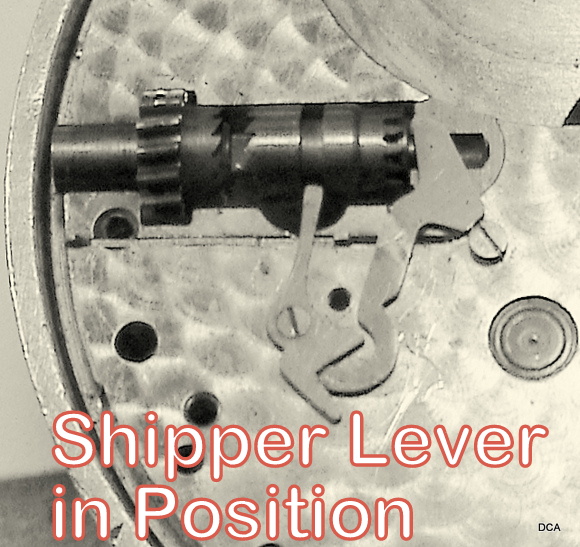
followed by the shipper lever. NOTE there is NOTHING on the dial plate that locates the shipper lever. The "Heel" rests against the little backup screw and the "toe" is put just under the winding stem assembly
The shipper lever is "kissing" the inside pivot notch of the shipper but is a "loose" part until the rest of the assembly is finished! . . .
Posts: 6492 | Location: Southern California in the USA | Registered: July 19, 2007
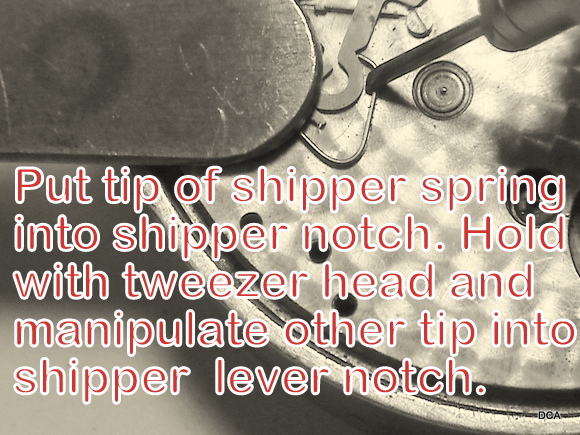
Position the shipper spring "toe" (either one) in the notch of the shipper and hold it as shown to manipulate the other spring "toe" into the notch on the shipper lever. BE VERY CAREFULY WHEN IT ALL "LOOKS" IN PLACE TO MAKE SURE THE SPRING IS NOT STARTING TO "LIFT OUT" WHEN TAKING UP THE TWEEZER HEAD.
Otherwise the shipper spring will "evaporate" causing a delay in the assembly time.
Posts: 6492 | Location: Southern California in the USA | Registered: July 19, 2007
Assemble the Cap and assembly screw fitted to the tapered hole in the cap to secure all the parts in position. When this is done you are safe to proceed with the rest of the watch assembly.
Posts: 6492 | Location: Southern California in the USA | Registered: July 19, 2007
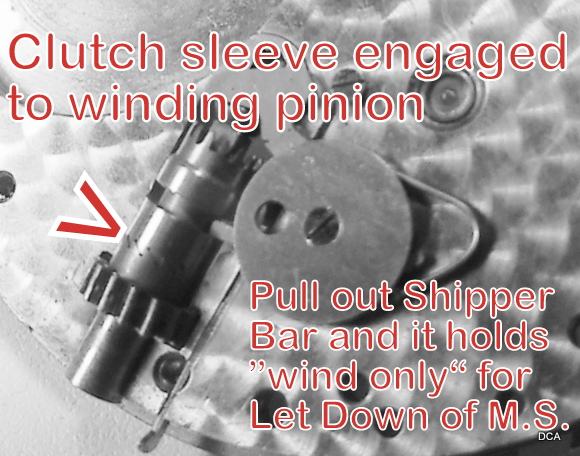
Regarding the shipper bar. When you pull this bar out, it pulls the shipper up keeping the clutch engaged in "wind" position. This is intended to help the watchmaker let down the movement and also fuss with the testing of the reassembled watch without having to push in all the time on his/her bench winding key
Posts: 6492 | Location: Southern California in the USA | Registered: July 19, 2007
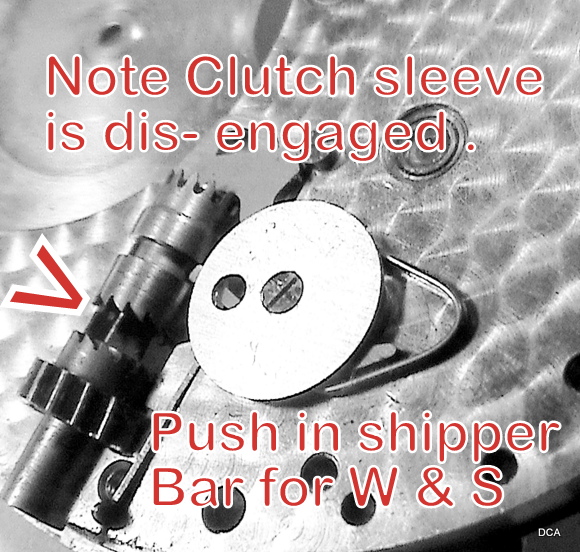
When the shipper bar is pushed in for regular use (and unimpeded assembly into a watch case) you can see that the clutch spring IS dis-engaged from the winding mechanism so the watch can be "normally" pendant wound and set. THATS ALL FOLKS!!!
Posts: 6492 | Location: Southern California in the USA | Registered: July 19, 2007
Dave, thanks for doing this pictorial. John Duvall used to do these.. But I haven't read any of his posts in a long while. I wish we could get more of our watchmakers/ watch repair folks to do these. They are a valuable tool for us newbie watch repair guys
Bruce Byrd
Posts: 888 | Location: San Diego, California USA | Registered: December 27, 2002
Excellent tutorial Dave. I don't have a lot of 16s Walthams, but this is a fantastic way of reassembling that. One question I do have. Is there a way to easily find all of your fantastic tutorials? I think there should be a place to have them all in one easy to find place, or maybe a sticky index post that links to them all so they can be easily found. The last one on how to avoid breaking pallet fork arbors was a lifesaver.
Posts: 1143 | Location: Chicago, Illinois in the USA | Registered: September 05, 2010
Dave, Even if you didnt want to collect them of the posts themselves in that area, and it would be a good area for them, a sticky post there with links to them all with a short description would be good. They would be an incredible resource for all of us that are still learning and those that start in the future. Because right now when they fall off the top page its harder to find , and even though they come up in a search they get mixed in with lots of posts on multiple pages.
Posts: 1143 | Location: Chicago, Illinois in the USA | Registered: September 05, 2010
We can explore migrating David's offerings into a separate section. Jim, if you and others would start by putting together a list and send the links to ihc185@roadrunner.com we can begin to put "David Abbe's Helpful Instructionals" all together for posterity.
And of course the "weakest link" in these watches is the setting lever which is available here...
THANK YOU so much Dave for your invalueable instructions, I have now managed to complete the watch and everything works great. I encountered two main problems: 1. The "U" shaped spring was worn to such an extent that it had very little springiness in it and 2. The large gear wheel was narrower than it should have been, in other words when the mechanism was working it was failing to engage with the teeth on the other wheel. As luck would have it, I had a spare which was approx 1mm wider and once fitted away we went. This is the first ever jewelled watch I have serviced and I am forever grateful not only to this fine website but the generous help you have all been now and in the past. Very warm regards from the UK.......Steve.
Posts: 189 | Location: Kent in the United Kingdom | Registered: May 27, 2010
Dave - Thanks ever so much. I was banging my head against the wall, trying to figure out how to get the durned shipper spring back onto a size 0 Grade 160 Waltham that a friend of mine asked me to service for her, and tried your method. It worked like the proverbial magic charm. I don't usually work on watches; I much prefer clocks - the older, the better. But now that I know your method, I am all stimulated, and am going to service my 12 size Waltham.
Posts: 213 | Location: Westminster, Maryland in the USA | Registered: March 02, 2015


 Internet Horology Club 185