
| WWT Shows | CLICK TO: Join and Support Internet Horology Club 185™ | IHC185™ Forums |

|
• Check Out Our... • • TWO Book Offer! • |
Welcome Aboard IHC185™  Internet Horology Club 185 IHC185™ Discussion Site Main Page Technical, Shop Talk and Internet Links Watch Repair Questions and Answers taking apart winding mechanism on Waltham 1900
Technical, Shop Talk and Internet Links Watch Repair Questions and Answers Go | New Topic | Find-Or-Search | Notify | Tools | Reply to Post |
hi everybody, todd here, i hope i am not being a pain in the butt with all my questions. i am presently disassembling a Waltham, 1900, size 0. i have gotten as far as the winding mechanism as pictured and stopped. i see there is a spring under the plate with 2 screws just below the winding mechanism. how do i remove this spring without it ceasing to exist except only in my memory. i have been playing with the winding mechanism with my bench key, what an elegant piece of engineering! so impressed. thanks everyone, really enjoying being your student. Todd 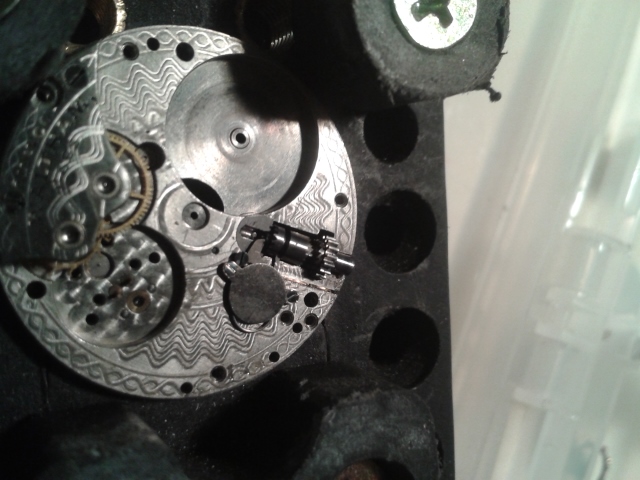 | |||
|
| ||||
|
hi Peter, -my point is this,- if i remove the plate holding the spring in place, while the spring is under tension, will the spring fly away? -my question is this,- do i need to somehow remove tension on that spring before removing the retaining plate, so that when i take the plate off the spring is all cool and relaxed, and just waiting for me to pick it up.rather than taking the plate off and having a spring staring at me all under tension and angry and wanting to disappear the second i touch it. Todd | ||||
|
| IHC Member 376 Watchmaker |
Todd if nothing is broken in the winding parts don,t take it apart, Take the rest of the watch apart but leave that part be .. , leave the winding parts together and go ahead and run it through the cleaner.. you can lube all the parts of the winding mechanism before you put it back together and it will work fine.. The winding parts and spring on these are a pain to get back together.. | |||
|
thanks for the suggestion Samie. | ||||
|
| IHC Member 376 Watchmaker |
Peter sometimes i will have to take these apart if they are very dirty or the parts are stuck together with gummy grease or oil ,,if not i leave them be and go ahead run them through the cleaner. | |||
|
hi guys, i am not taking the watch apart simply to clean it. i want to learn how it all works and how to disassemble and reassemble every part of it. leaving something in place would defeat this purpose so i am going to go ahead and take it apart and hope that spring doesn't fly away. wish me luck. Todd | ||||
|
Todd, If you want to take the round plate off just unscrew the plate screw while placing a piece of pegwood with the other hand on the tail end of the spring to keep it from taking off. Lay the pegwood flat across the spring to keep it in place. Sometimes the V shaped springs don't move, but it is better to be safe with them as they can and will travel. Rob www.pocketwatchrepairs.net | ||||
|
| IHC Life Member |
Todd, I have a tutorial about this at; https://ihc185.infopop.cc/eve/f...6047761/m/1113947577 | |||
|
thanks David, i found that in my searches of the old posts but didn't recognize it as being the same as mine. going to take a shot at it tonight. thanks again, todd | ||||
|
well, that disassembly went a little sideways. i held the spring down with a piece of pegwood as per Robs advice and removed the 2 screws from the plate, removed the plate while keeping the pegwood in place holding the spring down. and the shipper lever flew away. although the shipper is held in place with a screw the shipper lever is not. but i found it! 2 feet away on the corner of my bench. i have now reassembled and disassembled the shipper assembly 5 times and have learned the safest way to take this apart is to simply hold the spring down with a piece of pegwood and pull it out from under the plate with tweezers. no risk of anything taking flight and when you remove the plate nothing is under tension. Todd 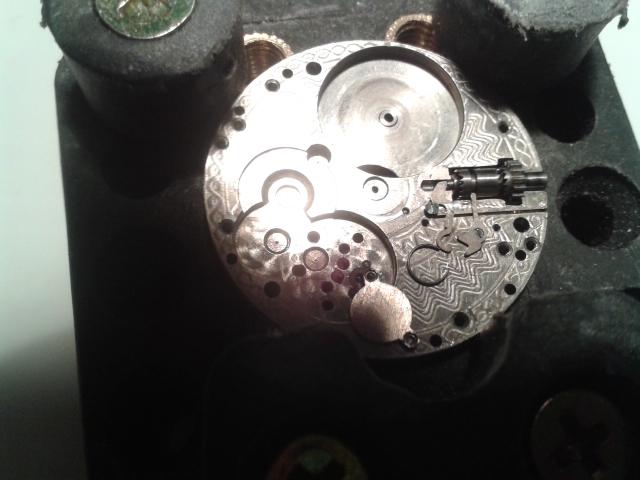 | ||||
|
| IHC Life Member |
Somebody had to lay awake for many nights figuring out the mechanical geometrics of that design! Mebbe they had better "happy tobaccee" in those days! | |||
|
it is really beautiful in its elegance of operation. i have spent a lot of time playing with it. | ||||
|
| Life Member |
It's a little late now, but when I take those apart, I stick a glop of Rodico over the whole shebang, and just leave the screw(s) exposed. I back the screws out, then carefully lift the Rodico with the spring embedded in it. Those who advise not taking it apart have more faith in their cleaner getting into (and getting the solution back out of) small places than I have. I have had a lot of excitement, and befouled the air with my language - (since I am alone, I can, and will drop the F-bomb at appropriate moments)while reassembling those gadgets. Dave's tutorial is as good a method as any I have tried for putting the durned spring back. Incidentally, if you look at the spring with a strong enough lens, you will see that (a) it is not a wire; it is a flat spring, and (b) sometimes the ends are not cut perfectly normal (at 90 degrees) to the length. I just reassembled a size 12 grade 220 today that took me three tries, because the ends of the spring were cut at a slight angle, and I had to get the spring right side up before it would stay put while I set the cap in place and started the screw. | |||
|
| Administrative Assistant |
New topic started relating to this titled… putting together winding mechanism on Waltham 1900 …please continue discussions here in this topic. Thank you | |||
|
| Powered by Social Strata |
| Your request is being processed... |
Welcome Aboard IHC185™ Internet Horology Club 185 IHC185™ Discussion Site Main Page Technical, Shop Talk and Internet Links Watch Repair Questions and Answers taking apart winding mechanism on Waltham 1900
Technical, Shop Talk and Internet Links Watch Repair Questions and Answers ©2002-2025 Internet Horology Club 185™ - Lindell V. Riddle President - All Rights Reserved Worldwide
| View $GS_USERNAME's User Profile | |
| View Recent Posts by $GS_USERNAME | |
| Notify me of New Posts by $GS_USERNAME |