
| WWT Shows | CLICK TO: Join and Support Internet Horology Club 185™ | IHC185™ Forums |

|
• Check Out Our... • • TWO Book Offer! • |
Welcome Aboard IHC185™  Internet Horology Club 185 IHC185™ Discussion Site Main Page Horological Discussions, Questions and Answers European Pocket Watch Forum DIY watch repair
Horological Discussions, Questions and Answers European Pocket Watch Forum Go | New Topic | Find-Or-Search | Notify | Tools | Reply to Post |
Next step is to remove the balance and balance cock assembly! Always do this before progressing Any further with Any repair on Any movement as it's so easy to bust a pivot. Trust me, that tiny little 'click' you'll hear as you accidentally press too hard on the edge of a balance rim will be a sound forever etched into your brain and wallet...........! Especially on a Cylinder type! When taking out the balance, I'd also recommend placing the movement close to the work surface rather than on a movement stand! The higher up it is, the further the balance cock will dangle on the hairspring mocking you to screw it up if you bungle lifting the assembly out! Been there, done that and got passably good at recovering the wreckage! Remove screw 'C', and look around the post of the balance cock for a notch! The temptation is to shove a screwdriver in it and prise the balance cock up and off! Don't do it! If all you have is a screwdriver, it'll do to start it moving, but - if you prise it up too far, it will tilt over and could break either a pivot or (worst case) the cylinder itself! Gently lift the balance end of the cock and the notch in turn to raise it off the pins until clear. Also take care lifting the balance end, not to catch and bend the hairspring at the stud, or the curb pin(s)! The curb will either be two short pins either side of the hairspring, a single pin in a hook enclosing it, or a later type 'Boot and Pin', can't see what it is on this watch. Gently lift the balance cock and balance clear of the movement and place it 'balance up' resting the balance in it's top jewel, to work on later. You may have to jiggle the balance around a tad to lift it out, as a tooth of the escape wheel is likely to be inside the cylinder. Have two sets of tweezers at the ready! The reason it is particularly vital to let down the mainspring on a cylinder movement before stripping it, is because if fully wound, And if you manage to successfully get the balance out anyway, the train will freewheel totally unchecked until the spring reserve is spent! A lever watch won't! On a low jewel count cylinder movement like this, all the pivots (usually all the way to the escape wheel) run in brass holes, which will most likely be dry as a bone, plus full of crud and worn metal. You could well end up with pivots beyond repair, and if one breaks during its 'screaming fit', you're likely to end up with a donor to chuck in your bits box!! JW. | ||||
|
Thanks Tom, taken a couple of hours off to get this posted so's Les has something to pass the time with! Have to say, it's bliss having a pc that works again! John | ||||
|
| IHC Life Member Site Moderator |
It is also nice to see you back on here too! I always enjoy reading your posts. Tom | |||
|
Thanks again Tom, always good to know folks enjoy what I post. Les, I've posted below photo's of a cylinder balance etc, and will run through the nomenclature for you and anyone else who hasn't seen these nightmares before! Ok the first shot is heavily posed, I cheated and put the lot on a stand After I'd taken the balance off ......... I've got enough spare bits without wrecking a perfectly good hairspring! John A. This is the notch for prying up a corner of the balance cock, ideally use a brass rod with a pointy end on it, a screwdriver will scour the brass if (when) it slips out! B. This is the later type 'Boot' combined with the curb pin. the hairspring sits between the edge of the boot and the pin. C. This is the end of the hairspring stud. This one takes the form of a collet pressed into the arm on the balance cock, into which the stud proper is pressed from under the arm. The hairspring is threaded through a hole in the side of the stud, then locked with a brass taper pin. D. Just visble is one of the locating pins which locates the balance cock securely on the dial plate. They can be very tight, so some care needs to be exercised to avoid damage.  | ||||
|
Same bits turned over! John A. Cylinder escapements have 'Banking pins' too! These stop the balance thrashing around if the watch is moved around suddenly! The pin on the balance also serves the dual purpose of aiding the repairer put the watch 'into beat'. If the hairspring collet is adjusted on the balance so that the pin is positioned on the centreline of the top balance jewel and the centre of the escape wheel pivot, in theory the escapement Should be in beat and the 'tick' quite even. This assumes of course that no one has knocked out the cylinder and turned it slightly in the balance hub!! B. A better view of the 'Boot', as it's name suggests, looks like one! The boot has a screwdriver slot in the end to facilitate turning it to release the hairspring which is captive under the 'toe'. Some care needs to be excercised turning these, as all manner of nasties can occur! Push too hard on the screwdriver, and the index lever it's rivetted to will twang off somewhere, and if it's a bad day will take the hairspring with it in a right old tangle! If the screwdriver slips, you WILL mangle the hairspring! and it will Probably be terminal! Get it even more wrong and you could bust the curb pin too, and if it snaps, they're not too nice to fix! The eagle eyed amongst you will already have noticed that this pin is kinked! C. The Stud from underneath with the taper pin visible. This pin has to be removed to release the hairspring, another trap for the unwary! The pin has to be removed keeping it straight, and without bending it over. If it goes over, the hairspring is likely to suffer some grief ..... followed by you! D. A Pivot! Pivots on cylinders, are actually plugs pressed into the end of the cylinder itself. The one shown is the lower pivot, and the narrow shiny band that's visible below it is the end of the cylinder ...... and All that locates it! The bottom plug is also tapered! The top plug is parallel walled and deeper! Both plugs require special stepped punches to knock them out, as they have to be punched from Inside the cylinder itself!! Naaarrrsty .............. E. The cylinder. Basically this is a hardened steel tube with an 'L' shaped hole formed in the cylinder wall. The 'L' is shaped to allow entry of the escape wheel tooth and the post it sits on. In action, the escape wheel tooth is arrested on both the inner and outer walls of the cylinder. F. Better view of the balance cock Locating pins.  | ||||
|
Thanks a pile for all that information John, absolutely brilliant you’re a wizard, I am going to print it out, it’s better than the book, I wont be starting just yet going to order hand puller, some oil, Now I did read that lighter fuel is a good cleaner ? Do you agree, or is there a better one, First problem the bezel seems as though its part of the case could this is the case? And I am going to photograph each operation as I proceed, Hope I have not taken too much of your time up John, re- The Albertina is marked 9ct on the clip, no other marks? Once again a big thank you and also to Tom Cheers for now, Les | ||||
|
My pleasure Les! I'll Email you for your address, and I'll send you my pair of cranked levers, I've plenty of rod to knock some more up if I need them. I'll also send you some 'peg wood' to clean out the pivot holes, all you'll need then is a razor blade or stanley knife blade to sharpen the ends to a point. Lighter fuel is just fine. To be honest, I now use it as a final rinse After my stuff has gone through the ultrasonic bath. Look for the tins with a spout that folds down. Take care using it too, I'd hate to see you get roasted before your turkey this Christmas! Hunt down some small plastic pots too, such as vitamin pots with snap on caps, they're good for soaking small bits in! Bezel. Look around the edge near the pendant for a small lip or notch, that's where a case knife goes to prise the bezel off or open. At a push, you could use the edge of a fine bladed penknife or similar. Press the sharp edge of the blade into the notch and rotate the blade to push the bezel off, being silver, it shouldn't be too tight. If the bezel is hinged, the tube will be visible, and will open from one side of the pendant. Good luck! John. PS. Photo's are good, saved my bacon no end! JW | ||||
|
Hi John, It resisted all attempts to remove it , So don’t know if I did right or not gave it a shot of wd 40, after a while it gave up I don’t think it has ever been off since it was made Les 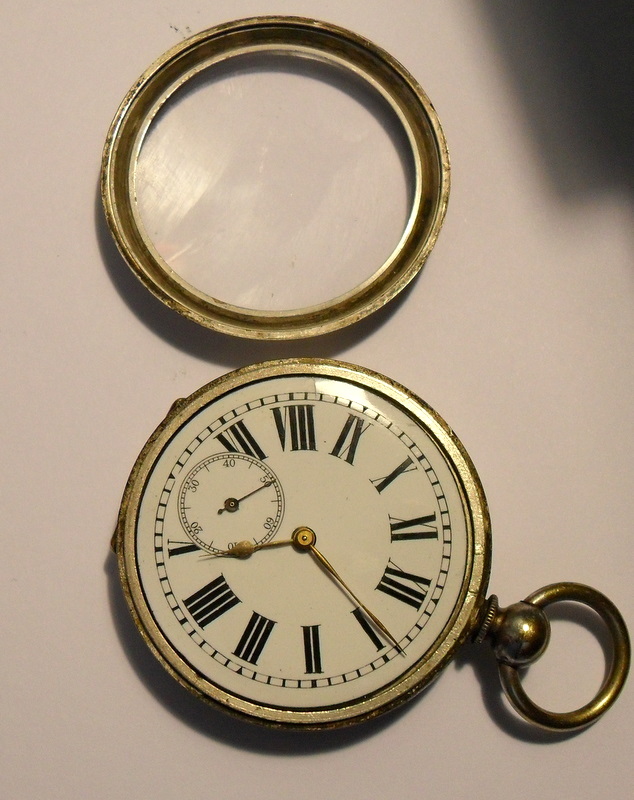 | ||||
|
Les, WD40 shouldn't hurt anything, and it's all going to be cleaned anyway. Looking at the bezel edge, it appears the lip is pushed inwards, this can only be done Fitting the bezel, not taking it off. Being an eBay offering, it wouldn't surprise me any if it had been fixed on with superglue! That kink on the bezel is enough to stop it snapping onto the case band. For a horrible instant, I wondered if it had a screw on bezel, but I can just see the knife relief on the RH edge. I'll send you the levers to get the hands off, then you can get to work on it! If you want to chance not damaging the hands, you could take the movement out of the case, and take a look to see what's holding the dial on. I can't see any screws visble on the accessible areas on the dial plate, so the dial is likely to be held with either screws into the side of the movement, or via taper pins through the dial pins which will protrude through the dial plate iteself. These pins if used, will be fairly close to the edge, and you'll see the small taper pins shoved into the side of them. The photo below shows a typical dial screw in the side of the movement, I'll dig out and photograph a typical taper pin type later on. John.  | ||||
|
Thank you John, I had already ordered a puller, it wasn,t to expensive and I also ordered a watch clamp, What the **** if it,s worth doing, the firm is here in liverpool, and with a tutor like you I,m priviledged Cheers Les | ||||
|
BOX 1 HOUR HAND, off PHOTO 1 “ MINUTE HAND off “ SECOND HAND off-- Hands came off very easily with puller  | ||||
|
BOX 2 SCREW B movement free small pin opposite 2 SCREWS FROM A Seems like its been out before, first screw was very loose, 1 screw missing . Suspicions aroused DUST CAP REMOVED, CAN SEE CLICK photo 2 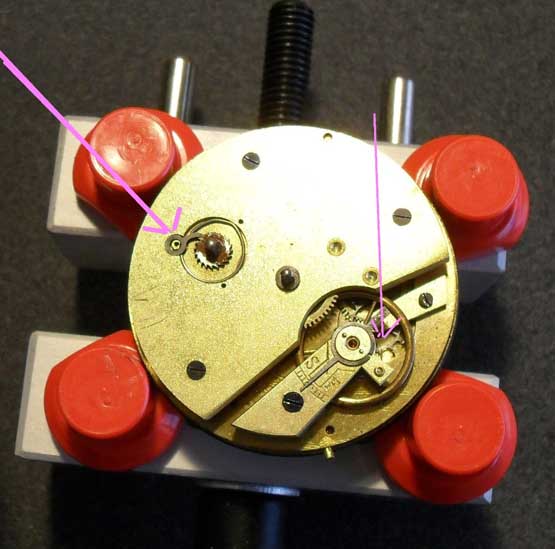 | ||||
|
BOX 3 Wound down the spring successfully, But the click was loose came off as I applied a turn on the key, I think this is a pig in the poke ( photo 3 ) Not my Lucky day Definitely been mangled before I got it ( Photo 4 ) I think it’s the type you mentioned, never mind good practice for me there was a small brass cog wheel came off it ?? Moved it on to back Box 4 Dial & Cog 2 legs on the dial 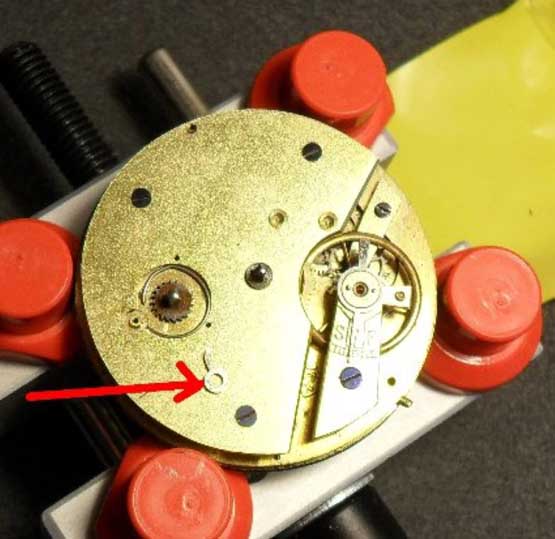 | ||||
|
5 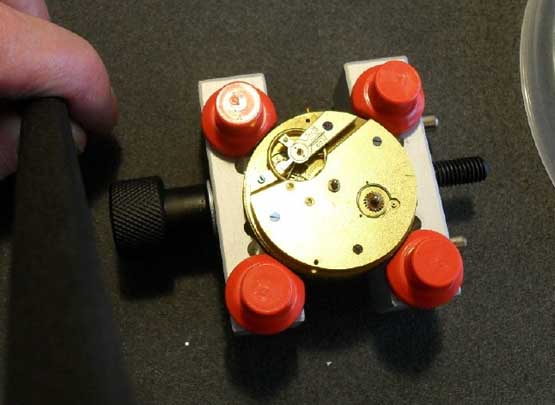 | ||||
|
6 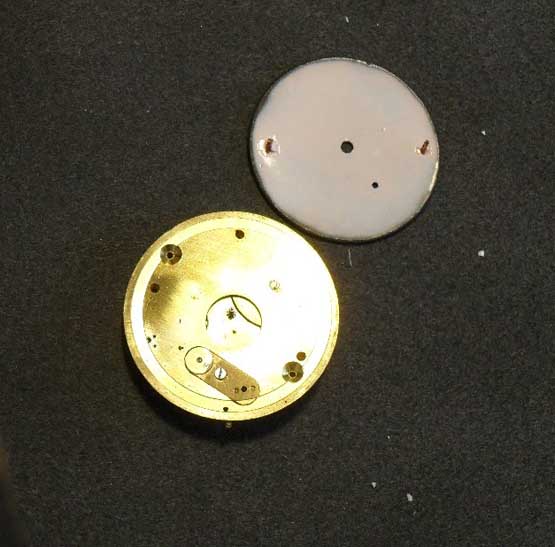 | ||||
|
Box 6 One load of junk, some one has had a go before, (Worse than me) Never mind, all good practice, at least John with what you have shown me I can be a bit more discerning on what I pick up, how you picked up on those small bits from a photo i/e the dings & bezel come to think of it super glue would be just about right, There where no jewels, the case is base metal, will look out for broken watches now to practice on, I also realized things that I can improve on i/e lighting, tools, Nowt like hands on for learning , Conclusion mass produced for fair ground prizes, ( knock 3 coconuts down and win a watch) Thanks so much John for your time and patience, Cheers Les 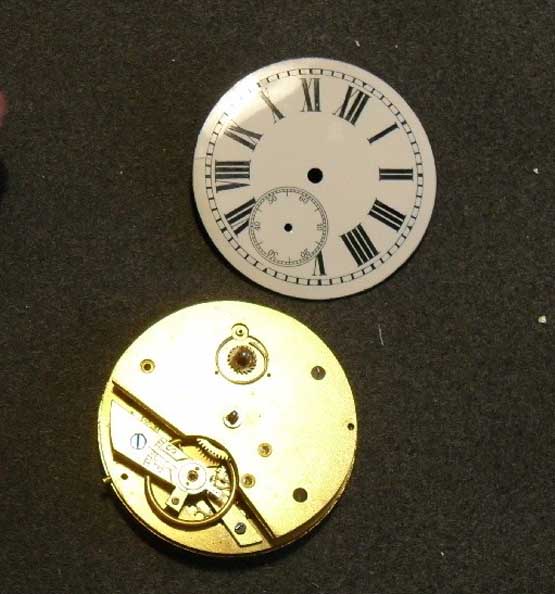 | ||||
|
7 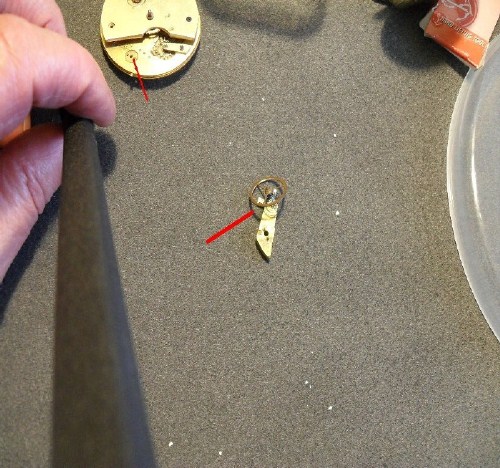 | ||||
|
Well done getting this far Les, but don't despair, there's nothing there yet that would cause me to scrap the watch! I can probably fit it up with a correct click spring and maybe a better fitting click. The hairspring damage is a bind, but I can probably fix you up with one of those too. The 'brass cog' will probably be the 'hour wheel', the hour hand is pressed onto this gear. There should also be another brass gear, which has a smaller steel gear in the centre, this fits on the small pin next to the centre pinion. You got a bit ahead of me at this point, but I'll put photo's up anyway. The case may actually be 0.800 silver, probably a Swiss import, have a hunt around on the inner and outer case backs for small hallmarks! I'll carry on with the strip down of this type movement anyway, and you can carry on following me with yours if you wish - good practice for you anyway! John | ||||
|
| IHC Life Member Site Moderator |
Enjoying reading & following this work in progress. I might add also learning somethings I didn't know. Tom | |||
|
Thanks Tom, more to come yet if Les is happy to keep going with it. Best regards John | ||||
|
Thank,s John, I shall do my best to keep up, Keep the thread going please, Regards Les | ||||
|
OK Les, we'll keep chipping away, I'm assuming the dial fell off your watch, but if it didn't, you would probably have had to either slacken screws in the side of the dial plate - as in the photo above, or remove taper pins from the dial feet as in the example below. John  | ||||
|
| Powered by Social Strata | Page 1 2 3 4 |
| Your request is being processed... |
©2002-2025 Internet Horology Club 185™ - Lindell V. Riddle President - All Rights Reserved Worldwide
| View $GS_USERNAME's User Profile | |
| View Recent Posts by $GS_USERNAME | |
| Notify me of New Posts by $GS_USERNAME |