
| WWT Shows | CLICK TO: Join and Support Internet Horology Club 185™ | IHC185™ Forums |

|
• Check Out Our... • • TWO Book Offer! • |
Welcome Aboard IHC185™  Internet Horology Club 185 IHC185™ Discussion Site Main Page Horological Discussions, Questions and Answers Pocket Watch Discussions Speaking of blueing........
Horological Discussions, Questions and Answers Pocket Watch Discussions Page 1 2
Go | New Topic | Find-Or-Search | Notify | Tools | Reply to Post |
i just ran across this thread... i may not be a watch mechanic... not by a long shot actually ... but i do like to tinker ... i'm going to see about building one of these for the heck of it... ;-) | ||||
|
Good luck Lou! It is pretty fun, just follow Harold's instructions and you should be fine. Thanks again Harold for this great idea! Here are some pics of the components and how they are wired. Note the red wire is one that I had as spare. It has silver wire, and is smooth. The top red wire is to the cartridge heater. 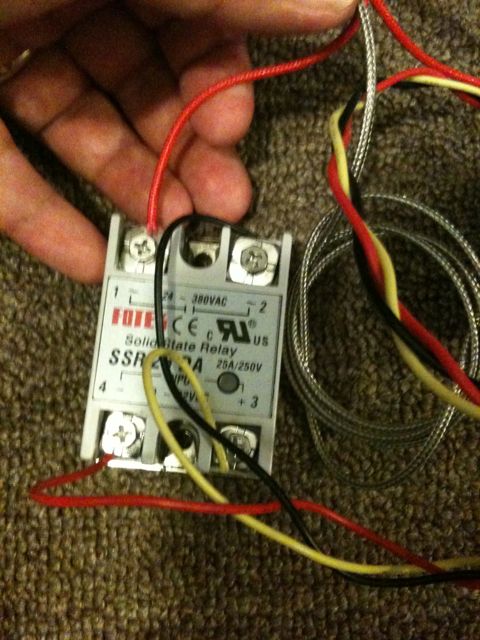 | ||||
|
Note the red wire on the top is to the cartridge heater. The two white wires on the left are to the power plug. I marked the bottom one black like in Harold's post. Please note that in Harold's post / picture, the 3 goes to 3, and the 4 goes to 4. In my case because of the relay I guess, they are switched. My relay counts clockwise, rather than sequential. As a result, mine had to go 4 to 3 and 3 to 4. 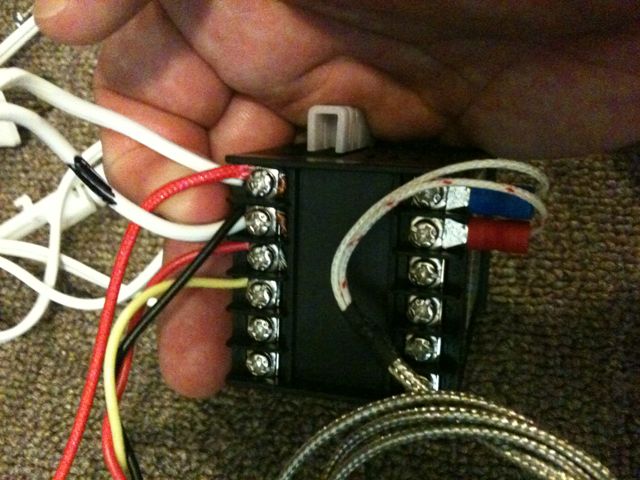 | ||||
|
Thanks for the idea and plans. Made the bluing machine with a block of aluminum and it works so well. Must remember to remove nickel plating or screw will not blue. Took a little while to set alarms properly for good function. Thanks Dan for the wiring correction, seems I have the same relay. 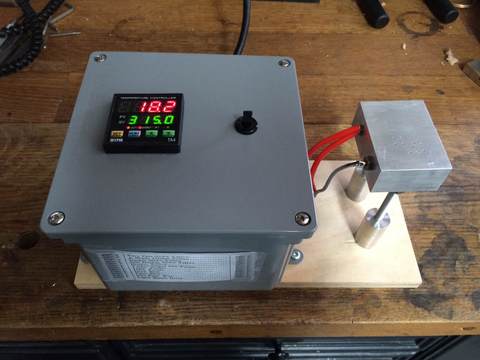 | ||||
|
| Site Administrator IHC Life Member |
Shawn your image was much too large to be viewed properly. I have resized it. Good job with the bluing machine. | |||
|
Glad it worked out! I find that sanding the screws in one direction seems to work better as well. I tried circular motions but had no luck. I usually sand 800 grit sandpaper if I need to break up rust, then 1500, then 2000. This little machine/project was well worth the investment and effort for me. Here is an ETA 6498 that I blued the screws on: 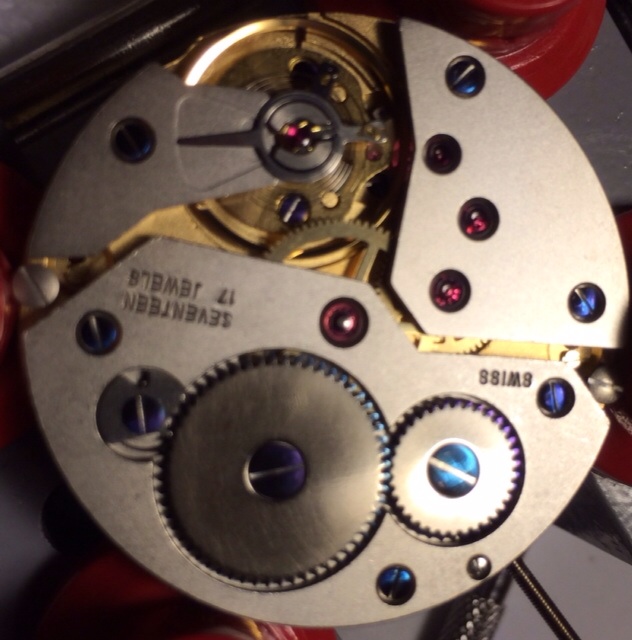 | ||||
|
| IHC Member 1736 |
Bigger was not be better for my bluing machine. I came up with a 2X2X3 block of aluminum and decided to build one of these. The block has two much surface area for the 200W heater and stalls out at 477degrees... apparently where the losses to ambient are equal to 200W of input. But, I had plenty of room to add a second heating element, so all is well. Additionally, even thought the English translation was really poor, the diagrams that came with my PID and Relay were correct. Thankfully, the Chinese use the same +/- designators as we do for electricity. I originally wired my RTD without regard to +/-... it didn't occur to me that an RTD would care about polarity. The dead giveaway was that my indication read -00.0 degrees, no matter what the unit was set for and no matter the actual temperature. I swapped the RTD leads and all is well. | |||
|
| IHC Life Member |
I love this topic! I'm not doing much watch work these days but if I were, I'd copy this setup for blueing...it sure beats the old pan and alcohol lamp trick! When I was bluing parts (mostly hands) I used a small kiln equipped with a pyrometer and a small opening. It worked pretty well but the digital method seems much more precise. William | |||
|
| IHC Member 1541 |
So once you are all blued up what method(s) are used to polish the bluing from the high point where the hole is? My only watch tools are tweezers and screwdrivers so I came up with the following method(as yet untried). I have some 9000 grit sandpaper. I am going to glue a dot to the end of a 1/8" dowel and put it in my drill press and see how that works. Waddya think? | |||
|
| IHC Member 1736 |
Lorne, Take a look at Dave Turners post on page 1 of this thread. He has a link to Roger Smith's work: http://www.youtube.com/watch?v...5LV6I&feature=relmfu That link will take you to a series of short videos I found fascinating to watch. His method for polishing the the center hub is quite simple and can be done with minimal tooling. If you want minty hands... you can use tooth paste for the rouge... and the bottom of one of momma's old sauce pots for the lapping surface. | |||
|
| IHC Member 1541 |
Thank you Paul, I missed that one. | |||
|
I usually use some of the 2000 grit sandpaper (a small piece) and either use an eraser to hold it, or a glue it to a toothpick to sand the minute hand center hub. Now, I decided to move on to something a bit larger. If you look at the ratchet and crown wheels of my last post, you can see a bit of blueing on the teeth and around the edge, like a small blue halo (customer LOVED it). I decided to try the whole wheel on my Panerai Homage. Took me a long time, and it still is not quite even, but it added some serious character I think. I will repost the picture here, I posted it to another area, but think it should really be in this area. It looks almost oily here, but when the light changes, it gets a deeper consistent dark blue. Take a look at the other post. Dan 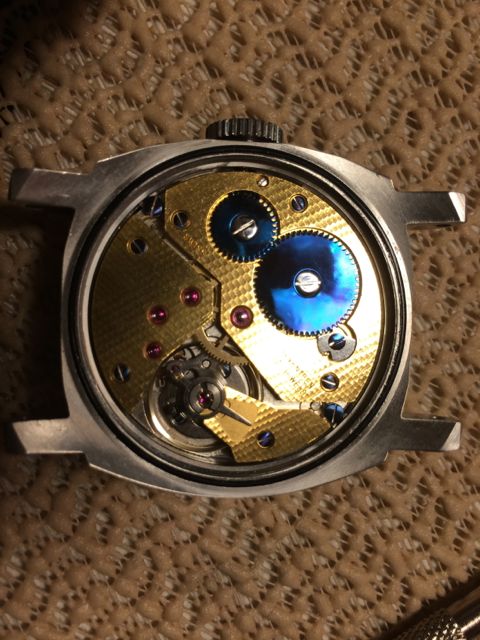 | ||||
|
Paul, where did you put the other heater, and did you connect it to the same ports / posts? Interesting concept. I think I have my thermometer and my heater switched. Heater is on one side of the block … like in the corner, and the thermometer is in the middle / side. I can't really move the parts now, so I deal with it being really hot on one side and not so hot on the other. Maybe to heaters would be the way to go. Can you post a pic? Dan | ||||
|
| IHC Member 1736 |
Dan, would I have ever benefited from the answer to your question. I got it about as wrong as it can get. I put my heaters across the top and the temp below and centered, about the same distance below the heaters as the heaters are below the top of the block. You would think I should know, heat goes up... To get 570 at the top of the block, I am indicating 430 on the PID... to get 545 on the block, I am indicating 405 on the PID. Here is a link to my Hamilton 917 Chinese Flieger dial and case conversion. The Wheel screws at 405 indicated and the plate screws at 430 indicated. https://ihc185.infopop.cc/eve/f...6009961/m/2343916287 Good news is that the temp is consistent in a large useful zone down the middle of the block. The second heater was a great advantage in that the heat up time is only a couple minutes and the block stabilizes pretty fast. Any time I changed the temp, I would allow it 10 minutes to "soak" and stabilize at the new temp. I used an infra red heat gun to get me in the ball park and then used a click wheel and click for testing. I kept dialing the temp down 10 degrees at a time until I finally got to a temp that gave me consistent color on everything from plate screws, to hands and wheels. What I learned is that small items will pick up color fast and they can be snatched off the block when the desired color is achieved. For beefy parts, I found it better to let them soak for a half minute or so... which means, the temperature has to be dead on and stabilized. This gave time for the larger items to let the color travel and even out on the whole part. If the block is too hot, it goes to a lighter, less brilliant color... easy recovery though, just sand her down again, dial the temp down, wait ten minutes and try again. Great fun. 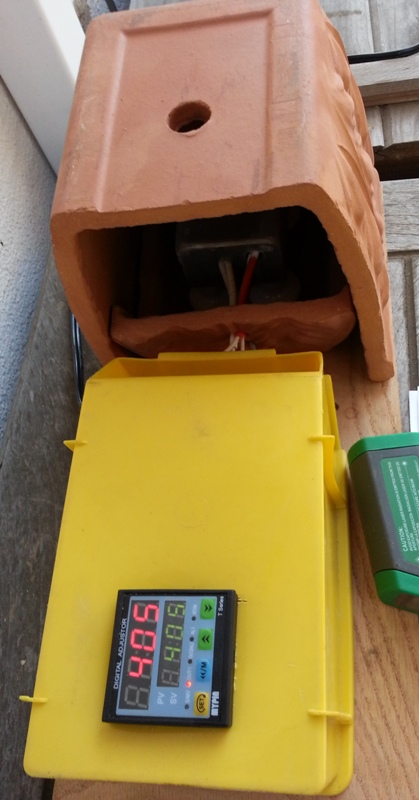 | |||
|
| IHC Member 1736 |
After reading the comments on how sensitive the process is to cross breezes and how the heat from the block can be a hazard... I fashioned an oven from an old terracotta planter. A screw driver in the drain hole works great as a handle to rock the lid back to place and remove parts. 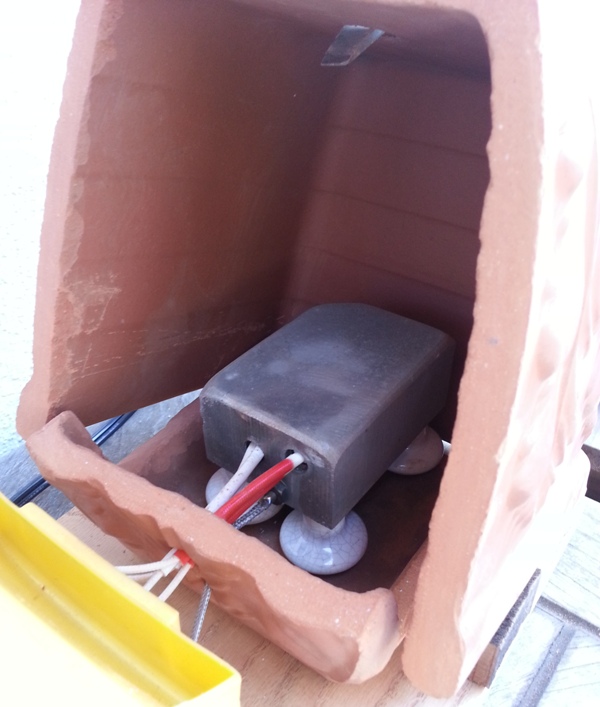 | |||
|
| IHC Member 1736 |
The heaters are wired in parallel. The unit sees a 400W heater. (a bit less than 4 amps and well within the capacity of the relay) Heat up and time to stabilize is 15 to 20 minutes. 3.69 amps/431 watts heating up 2.5 amps/200 watts holding temp at 540 degrees works out to 5 cents per hour to operate Ironically, I think a person could wire a 200 watt heater on a switch in a 2X2X3" Aluminum block with out a PID and just move parts around on the block to find the temp zones you need for the color you are looking for and be out of the whole project for under $10.00. 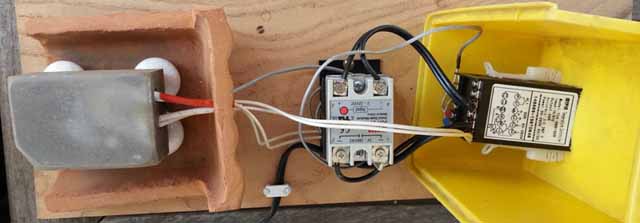 | |||
|
| IHC Member 1736 |
The feet are circa 1956 bonafide porcelain drawer pulls from an old kitchen remodel. If I had it to do over again, I would invert the heater and temp sensor pattern. Heaters low and either side of center, RTD top center, close to the upper deck. 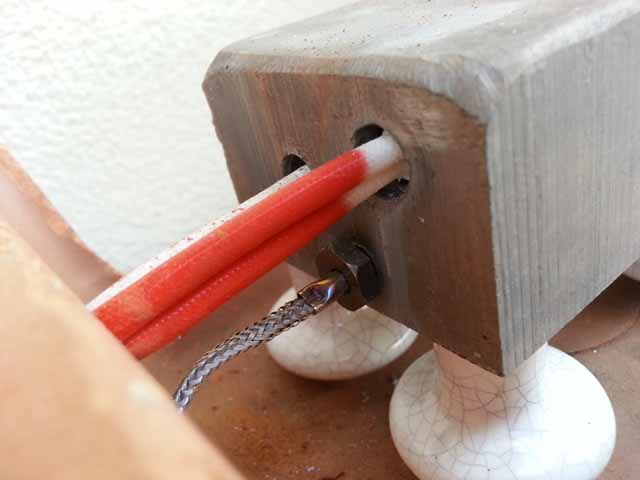 | |||
|
Was the question you are referring to the one about having two heat canisters (I tend to ask a lot of questions I made mine based on Harold's pictures at the beginning of this post and didn't really think about heat transfer. I do like your teracota pot idea. Like a little kiln Dan | ||||
|
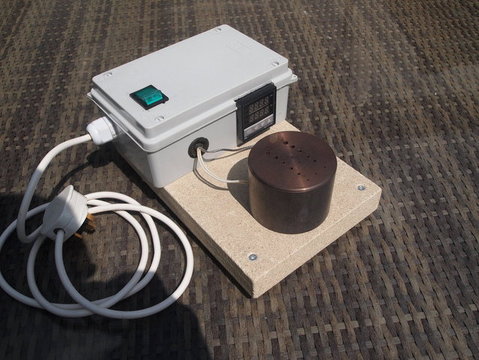
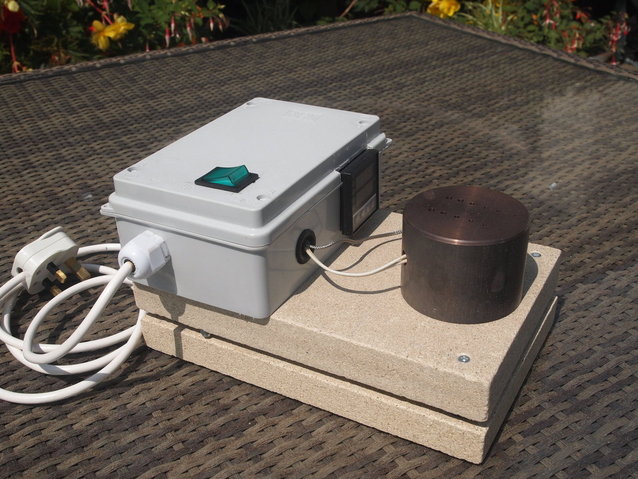
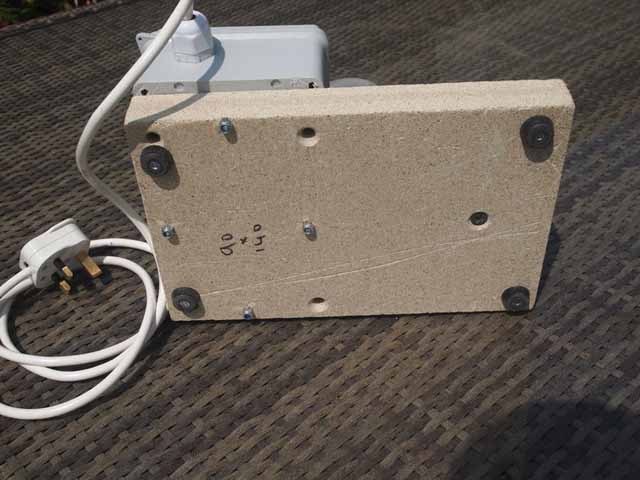
Many thanks to Harold Visser for the initial post and all the technical information. I made one using the same components and after quite a struggle with the language managed to get it working. The heated table was made from a piece of 3" dia brass bar. I overcame the heat transfer problem by making the mounting base out of 25mm thick fire bricks which can be easily cut and are quite light. Put four rubber feet beneath then, just in case, I sat the whole lot on another fire brick. No heat comes through to do any damage beneath. Very neat and tidy. | ||||
|
1.  | ||||
|
2.  | ||||
|
3.  | ||||
|
Its a nice looking device Mike, I am almost done with mine, just waiting for brass piece. I had to modify a bit due to different temperature controller, will post pics when it's finished. I also plan to use fire brick as base. Btw. Is it Wallsal West Midlands? I used to live in Wolverhampton for few years... Tara bit Rafal | ||||
|
Hello Rafal, nice to hear from you. It's a small world. Yes Walsall West Midlands and we meet on an American site. Fire brics are easy to get and work well. All the best with your project. Tara a bit to yo our kid | ||||
|
My device is finally working. I did some tests and Im quite happy about results 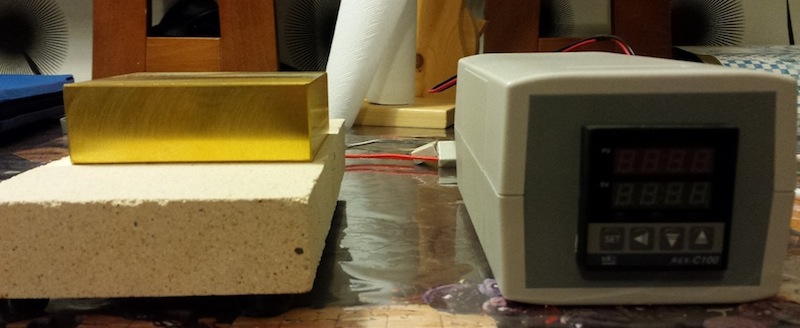 | ||||
|
Thanks guys for an idea 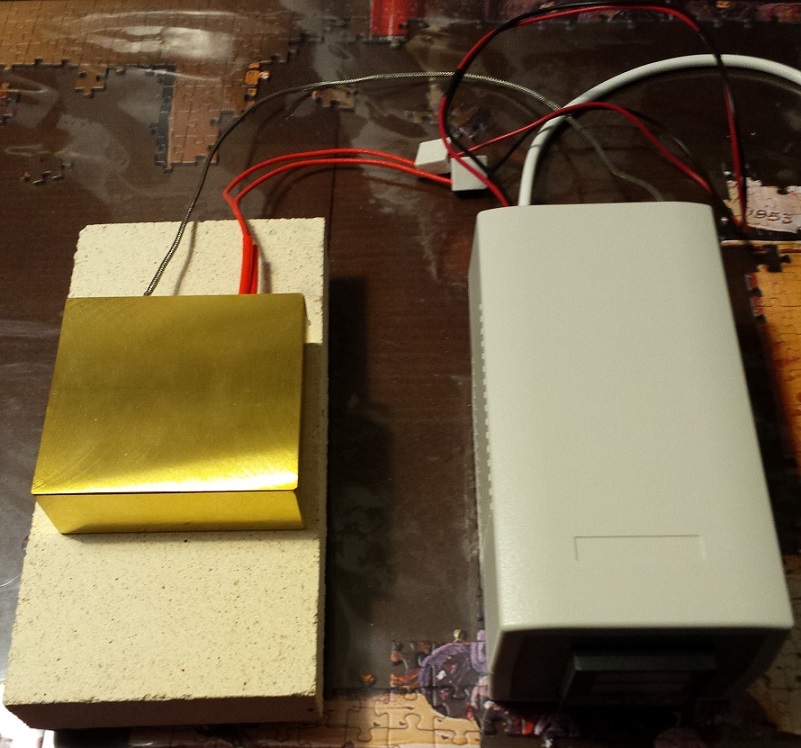 | ||||
|
| Administrative Assistant |
Jeff Ainsworth IHC Member 2079 posted July 07, 2019 04:53 ___________________________ Was wondering if someone could advise me of the approximate time required to heat the brass block to temperature in Harold Visser's oven was going to use a 200w heater and depending on what I can access 1.5by 1.5 by 2 inch long block of brass (I am interested to also find out what size others have used) need this information, very approximate will do as we only have off grid power out here ___________________________ . | |||
|
Could someone advise me of an approximate time for brass block to come to temperature I am trying to access a block 1.5 inches square by 2 inches long I have no idea if it takes a half an hour or many hours | ||||
|
| Powered by Social Strata | Page 1 2 |
| Your request is being processed... |
©2002-2025 Internet Horology Club 185™ - Lindell V. Riddle President - All Rights Reserved Worldwide
| View $GS_USERNAME's User Profile | |
| View Recent Posts by $GS_USERNAME | |
| Notify me of New Posts by $GS_USERNAME |