
| WWT Shows | CLICK TO: Join and Support Internet Horology Club 185™ | IHC185™ Forums |

|
• Check Out Our... • • TWO Book Offer! • |
Welcome Aboard IHC185™  Internet Horology Club 185 IHC185™ Discussion Site Main Page Technical, Shop Talk and Internet Links Clock Repair Questions and Answers E. Ingraham Project
Technical, Shop Talk and Internet Links Clock Repair Questions and Answers Go | New Topic | Find-Or-Search | Notify | Tools | Reply to Post |
Fixing up an old Ingram Black Mantle(wood) clock and need a couple of "plastic" columns for replacement. Each column is 3 3/8" long X 3/4" wide and 5/16" deep 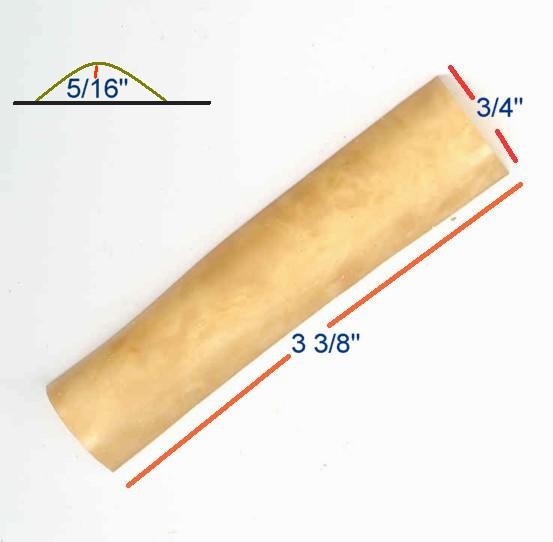 | |||
|
They are available at Timesavers. http://www.timesavers.com/ Bob | ||||
|
Here is what I got so far. Wish I could find some plastic columns though...maybe at "Eastern" conference in August.  | ||||
|
Nice work, Greg! Was the gold incising/stenciling hidden under all that dirt? If so, what did you use to clean it? If not, what did you use to restore it? | ||||
|
| IHC Life Member |
Very impressive Greg! Brief resume' of work history? Timely regards. Roy. "So mote it be!" | |||
|
Some of it was. I use straight Tide laundry detergent and a rag, a lot of rags, and a lot of time, to clean these types of cases. I've tried all kinds of other "antique restorers" and the lot, but I've found this to be the best for me. If you try it you'll see why I don't do very many. It took me about 8 hours of rubbing and buffing for this one. But when finished it will leave what I believe to be the original finish whether shellac or varnish. I've also tried brushes with the tide, but seems like only rags will do it correctly. The "stenciling" was mostly there, in the form of tiny indentations or "prick" marks. I had to guess the shape in some areas. I used "Liquid Leaf" and a homemade scratch tool to make the marks. For every dip of the tool I could get 2-3 small dots and one dip of the tool for the large dots. The "legs" were purchased from Timesavers and then repainted with the Liquid leaf to make all of the "gold" pieces match. The dial was remade on the computer with the aid of Adobe Photoshop. I'm tried an experiment with this one by printing it onto Kodak glossy photo paper...I don't know how long it will last but for now it looks like an enameled dial! I'm not pleased with the "Marble Columns". I used (again) photo paper, pc, and a texture sample. I'm just not impressed. That's all I can think of to tell you at this point, except that if you do try the tide...try finding someone to do it with you...makes time faster | ||||
|
Greg, outstanding job on that restoration. A tribute to your talent and patience. I have seen many replaced columns. Usually wood dowl with a faux marble finish. Your idea of photo paper with the marble design is very good. It is probably as substantial as many of the cellluloid columns that were easily broken. Great job! If I come across a set of original colums I will keep you in mind. Tom | ||||
|
Thanks everyone for the comments | ||||
|
| Powered by Social Strata |
| Your request is being processed... |
©2002-2025 Internet Horology Club 185™ - Lindell V. Riddle President - All Rights Reserved Worldwide
| View $GS_USERNAME's User Profile | |
| View Recent Posts by $GS_USERNAME | |
| Notify me of New Posts by $GS_USERNAME |