
| WWT Shows | CLICK TO: Join and Support Internet Horology Club 185™ | IHC185™ Forums |

|
• Check Out Our... • • TWO Book Offer! • |
Welcome Aboard IHC185™  Internet Horology Club 185 IHC185™ Discussion Site Main Page Technical, Shop Talk and Internet Links Clock Repair Questions and Answers Mainspring
Technical, Shop Talk and Internet Links Clock Repair Questions and Answers Go | New Topic | Find-Or-Search | Notify | Tools | Reply to Post |
Hello I'm new to the site and horology as a hobby. Interested in doing some basic repairs on an old movement to try and learn. Obviously the main concern is dealing with the mains spring. This needs to be dealt with before I can even think about taking apart a movement. Not wanting to spend too much money to start with in case I do not carry on with repairs I was looking for winders etc. These tend to be expensive but I did find something that may do the job. The link below is for several tools but about half way down the page I was looking at the T-S 163 Mainspring Winder. Can anyone tell me if they have used these and how easy / safe they are to use. If there is a link to a video on its use would be great. Tools I was also looking at the T-S 353 Clock Mainspring Let Down Tool just below it and the T-S 598 Clock Spring Clamps to complete dealing with the Mainspring. Many thanks for any replies. | |||
|
Welcome Paul, If you're just getting into the hobby, and need to let a spring down quickly, you can improvise as I did. Just take a piece of wood, cut a slot in it to fit the clock key snugly. Be sure and hold it tightly, and a pair of gloves is a good option. The item you mention looks like a good one, but it's also a little pricey. Unless of course, cost is no option. Dave Turner 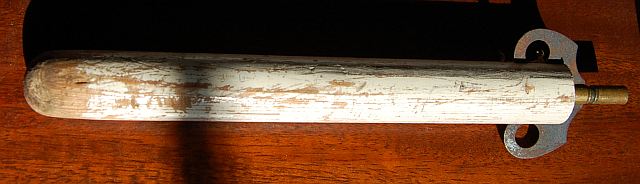 | ||||
|
| IHC Life Member |
Hello Paul, PLEASE be VERY careful working with clock mainsprings. You can lose fingers, eyesight and do considerable damage unless you have the proper tools and know how to use them. Yes, the tools can be expensive, but cheap compared to what can happen without them. | |||
|
Thanks fro the replies. The main item I was worried about is the T-S 163 Mainspring Winder. This is cheap compared to the proper items with a ratchet and I was more concerned on if you can use it easily to wind the spring. I know the springs can be dangerous which is why I am asking the question about that item as the main element. Paul | ||||
|
Hi Paul I am new also and have used that winder. Wear gloves and eye protection. Also it takes hand an arm strength so it won't get away from you. It does wind a spring but not fun or safe. | ||||
|
It looks like I now have my first project. Just had the item below delivered and the Main Spring for the hourly chimes has either broken or become detached from its clips inside. There is a stamp on the back that says. THE ST.JAMES CLOCK CO. TWO(2) JEWELS UNADJUSTED MADE IN WEST-GERMANY 340-020 Other than the obvious of pliers and spanners can anyone tell me what tools I would need to safely take this apart to check the spring? Then if a new spring is to be fitted what tools I would need to complete the project? I can probably remove most of the power from the other two springs without buying a letdown tool (hoepfully) and when the power is light I can use a key to take the tension when disconnecting the ratchet to let them down fully. If I can fix this myself for a reasonable cost then I would go ahead any buy an Ultrasonic bath to clean all the items along with oil to hopefully get the movement fully running properly knowing I have the equipment to do some of the others I have. Paul 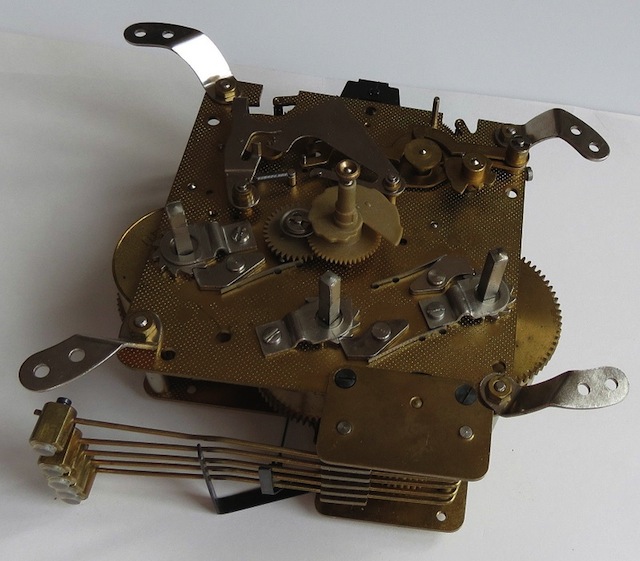 | ||||
|
Paul, I'm sure others here might be able to help you with this, but let me suggest you get another old movement to work on before you tackle this one. The first thing I see on this movement is that these springs are in enclosed barrels. And in my opinion, these are the hardest to work on. If you don't have a proper mainspring winder it will be very difficult to replace the springs, or remove them and clean them. The proper tool for that looks something like this example: (And there are many that are less expensive too) spring winder And there are many other types. Dave Turner 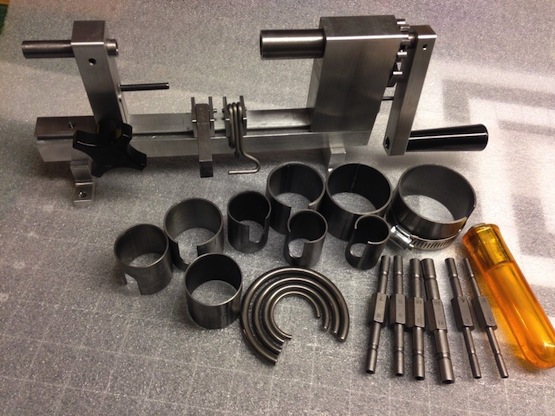 | ||||
|
| ||||
|
Paul, Found an interesting old post here about spring winders. Joe Collins spring winder I made a version of this winder using his plans. Additionally, if you want to tackle the movement, you might consider taking it down and inspect the springs intact. They might be good and you could get by by leaving them assembled. Or, you could remove the barrel cover and inspect the springs without removing them. Dave Turner  | ||||
|
| Life Member |
Here is one I just finished making today. (I had an Ollie Baker type, but lost it when I lost my house in 2012) I have a set of letdown keys - the shank on them is either 11mm or 7/16" - I didn't bother measuring - I just grabbed a 7/16" deep well socket. (When I worked as an auto mechanic, I often interchanged 11mm and 7/16" wrenches - 1/2" and 13mm, and 3/4" and 19mm will also interchange) So the drive for this is 3/8" x 12" extension, with a 7/16" deep well socket. I haven't yet made barrel clamps, but intend to do that little chore tomorrow. Most of what I work on are American clocks, with open springs. They don't show in the photo, but there are two pins in the backing piece on each side of center. Either one can be slid forward for loop end springs. Construction is of 3/4" Marine Plywood, Finish grade AB. Overall dimensions are (nominally) 14" long, 6" wide and 7" high. Because there is no brake or ratchet stop on it, I am toying with the notion of using a pulley with a set screw and an old V-belt as a brake. I figure it would be easy to mount that inside the "box". I also think I will probably make an acrylic cover, so that I don't have to worry about "exploding" spings. It can be a exciting when a spring breaks while you are winding it, or the hole end rips out. or the loop end rivet pulls out. I am thinking a sheet of unbreakable safety glazing might make me a little less nervous about playing with springs. (That lack of safety restraints, or any way to attach one, was my biggest complaint with the Ollie Baker-type winder.) I made this one a little sturdier than Dave Turner's version (see preceding post for photo) because I remember dealing with a Seth Thomas Sonora chime spring in my Ollie Baker winder, and being concerned that I might bend something. Those springs are pretty serious. 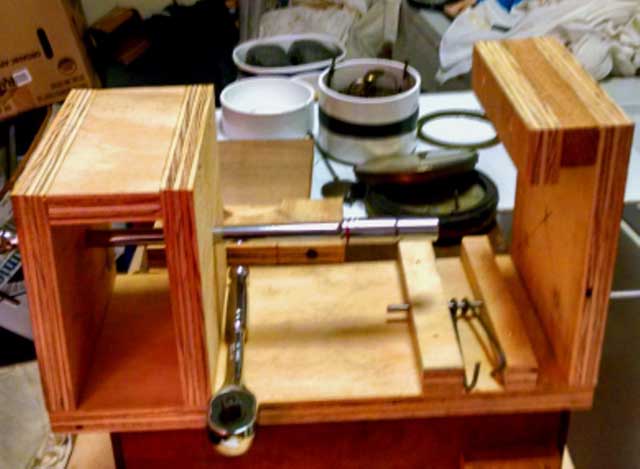 | |||
|
I will add that you can get an Ollie Baker winder for $235.00 at Timesavers. The cheap one isn't very easy to use. A multi chuck let down tool is one of my most used tools. I can't find one at Timesavers. BE CAREFUL and good luck. Springs in barrels are not a good starting point also.. I have used a Webster for 30 years with a few modifications and wouldn't be with out it. Just my thoughts... Bill Carlson 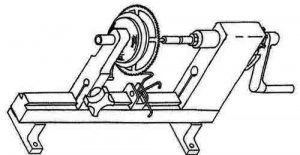 | ||||
|
| Life Member |
Someone should warn you that this movement is not intended to be repairable. The pivots are made of soft steel, which is then chrome plated. When the chrome plating wears through (about fifteen to twenty five years after manufacture) the pivots are shot. The only fix is to (a) repivot each arbor or (b) ream out all pivot holes and install ball bearings. The bearings are available from Butterworth, but are not inexpensive. Repivoting is cheaper, but requires a lathe and a little practice. When I repivot, I do not try to make the new pivot a "tunking" fit. I make it dead snug, and use a tiny dab of locktite in the hole. Pivots that are drive or press fit can give you problems because sometimes driving them in splits the arbor. When that happens, you have a serious repair problem on your hands. Don't ask me how I know this. | |||
|
David I saw a YouTube (cannot find link) where the clockmaker drilled the pivot, then left the bit as the pivot. Have you heard of this? What do you think? Mike | ||||
|
| Life Member |
I have not heard of this, but I suppose it could be done. I would think that it would require seriously "deep drilling" though, to get the bit deep enough to avoid exposing any of the flute. Drilling that deeply is always a little bit dicey. What I like to do is use a bit of scrap brass rod to make a dedicated bit holder. I turn a taper on it to fit the tailstock, then, with it in the tailstock, chuck my pivot drill in the headstock and drill a blind hole in the brass. I then locktite the bit into the brass, and chuck the arbor in the headstock. That way, I know my drill bit is centered. I use a piece of drill rod the same size as my drill bit to make the new pivot, and insert it with locktite, then turn it to length and polish it. I generally drill and seat the new pivot following the same rule as I use for setting fence posts outdoors; one third of the exposed length is the minimum depth of seating. | |||
|
That makes sense and is more economical than wasting a bit for each pivot. Thank you Here is a video of that, me thinks he drives the pivot home with some heavy whacks of the hammer Pivot repair sept 2015 | ||||
|
| Life Member |
When I first started in clock repair, I used to make my pivots a drive fit, but when I was working for Bob Goodman (a retired master watchmaker from Hamilton) he "set me up" by having me re-pivot an arbor that he knew would split if the pivot was too tight. I was driving the pivot in as I always did, when the durned arbor split for almost 1/4 inch in from the end. Then I had to cur the arbor off, and make an arbor extension, and turn a new pivot on the end of it. Ever since then, I have made replacement pivots with a "zero" clearance, and depended on Loctite to hold them in. I have never had one come out, and I have never split another arbor.(French clocks, especially are prone to splitting when a pivot is driven in. The arbors in French clocks are quite hard, and often left with a very high temper; you will probably have to use a carbide drill bit if you ever have to re-pivot one.) It is good to know how to make and install an arbor extension though, because sometimes, when a mainspring breaks, or a click fails, the spring flies around inside the clock and bends arbors. Generally, trying to straighten a bent arbor is an exercise in frustration. It is usually easier to cut the arbor off behind the bend, and drill it out to take a new extension on which a straight nipple has been turned. Here, again, I try to make the nipple a zero clearance, but not interference fit, and retain it with Loctite. I let it set up overnight, before attempting to turn a pivot on the end. I think Al Takatsch has a video on YouTube, that he made doing a re-pivoting job the same way I do them, except he uses a Taig lathe and three jaw chuck, where I use an 8mm Peerless and collets. Al likes to hold the drill bit in a pin vise. I can do that, but I just feel more comfortable using the drill bit in the tailstock. I also don't bother with a centering tool, because I have a dedicated tailstock with a machinist's center drill in it. (Several years ago, Al and I gave a class to the Horological Association of Maryland about methods of re-pivoting.) He posted a couple of videos about clock repair after his move to New York. It might be worth your while to search them out. I should mention about tooling: Don't feel like you have to run out and buy the latest and greatest Sherline lathe. The 7 x 14 lathes sold by Harbor Freight are perfectly good for anything you might want to do with clocks, unless you get into working on tower clocks, and are currently selling for about half the price of a Sherline. As Al says in one of his videos, you probably want to steer clear of old watchmaker's lathes. I agree with him, unless you get one really cheaply, because all the tooling you can find for them is likely to be used, and you often discover after winning it on an auction site, that it was abused. Also, the watchmaker's lathe is too small for a lot of clock work. You will often find yourself wishing you had something with about 3 inches of swing, which is about an inch more than the standard 8mm lathe. | |||
|
| Powered by Social Strata |
| Your request is being processed... |
©2002-2025 Internet Horology Club 185™ - Lindell V. Riddle President - All Rights Reserved Worldwide
| View $GS_USERNAME's User Profile | |
| View Recent Posts by $GS_USERNAME | |
| Notify me of New Posts by $GS_USERNAME |