
| WWT Shows | CLICK TO: Join and Support Internet Horology Club 185™ | IHC185™ Forums |

|
• Check Out Our... • • TWO Book Offer! • |
Welcome Aboard IHC185™  Internet Horology Club 185 IHC185™ Discussion Site Main Page Technical, Shop Talk and Internet Links Horological Tools, Books and Miscellaneous When I was younger and dumber........
Technical, Shop Talk and Internet Links Horological Tools, Books and Miscellaneous Go | New Topic | Find-Or-Search | Notify | Tools | Reply to Post |
| Watch Repair Expert |
When I was younger and dumber, and had only been working on watches for a short time, my old mentor gave me an English fusee to restore. He told me I could have it if I could make it run, and I did. Unfortunately, I'd never actually seen a watch key before, and I really didn't know exactly what they were supposed to look like. I also didn't know they were still available, and I went to considerable effort to make my own, which is shown in the image below. It's about 3/4" long, by about 3/8" in diameter, and has happened to fit a number of watches I've owned over the years. I ran across it with a watch in the safety deposit box the other day, and I thought some of the folks here might get a kick out of seeing it. ========================= Steve Maddox Past President, NAWCC Chapter #62 North Little Rock, Arkansas IHC Charter Member 49 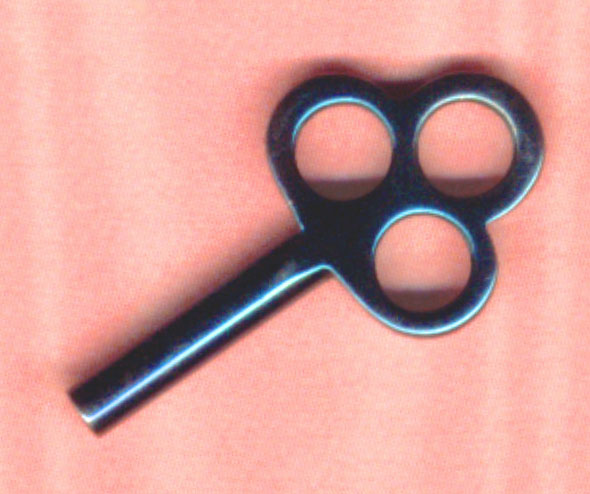 | ||
|
I think you did a great job on the key there Steve.As far as younger and dumber we all start off a little dumber and younger and we hope to get older and wiser. From what i know of you, you were interested in this at a young age.Not many people stay true to their early interests. Kevin "Veritas" West IHC Member 261 Chapter 111,Ottawa NAWCC Member 158976, Nepean, Canada | ||||
|
Steve Just out of curiosity, how was the key fashioned. Frank Frank Juchniewicz | ||||
|
| Watch Repair Expert |
Frank, The watch key above was turned on an engine lathe (a Logan 1920-H, to be specific), and it was made from an old armature shaft from a burned-out electric motor. The end with the square hole was made first, and the hole was punched before I went to the trouble to finish the rest of the key. To understand what the original "blank" looked like, just imagine the profile of the key spinning, and that's essentially how it appeared in the early stages. Once I'd successfully punched the square, I finished roughing the rest of the key, and left it attached to the stock by a thin spindle of metal at the upper end. I then used a bench grinder to grind the sides as flat and parallel as possible. Once the sides had been ground flat, I then punched the center marks for the three holes, and drilled those. I then returned the stock to the lathe, polished the shaft, and used fine sandpaper and a buffer to polish the whole key. The last thing I did was part the key from the stock at the top, after I'd finished and polished every other surface. I then smoothed the place where the key was parted, and blued it using a propane torch and a thick piece of aluminum plate. There were really two smart things I did in the whole operation: first, I punched the hole and made sure that went well before doing anything else (and it took a couple of tries to get that right); second, I left the key attached to the stock until the very last, which made it infinitely easier to handle. For some reason, just about everyone who ever sees that key and knows that I made it, asks the same question: "How did you make the square hole." I've grown so used to that that I always provide the same reply; I tell them: "I drilled it with a square drill bit." Although that's the only watch key I've made, I have made a few crank keys for clocks, simply because nice crank keys are not readily available. The image below shows the crank key I made for my Seth Thomas Parlor Calendar #10. It's made from a piece of 3/8" brazing rod that was turned in as similar fashion to the key above, except that it obviously had to be bent after the turning was finished. Essentially the same procedure was followed as for the making of the watch key, but with two addition "tricks." First, after the key was parted from the original stock, the end with the handle had to have a shoulder carefully cut and prepared to rivet into a small washer that would eventually retain the handle. Second, the finished turning had to be heated with a propane torch at the points where the 90 degree bends were made, in order to achieve a nice, relatively sharp bend, as near as possible to the flared ends of the central shaft. That wasn't a problem at the big end with the winding square, but at the other end, it was tough to get the rod to bend in the right place without bending the section that passes through the handle. In any event, the image below shows the second crank I made, which I think is a little more "graceful" than the first. The bends are a little sharper, the center section is a bit thinner, and the ivory handle is a bit more shapely. I'll post an image of my first crank key in a subsequent reply to follow: ======================= 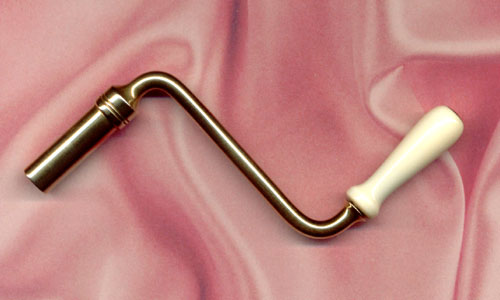 | |||
|
| Watch Repair Expert |
The image below shows the first crank key I made, which routinely winds a ST #2 regulator. The same procedure was used as for the one above, except with less "refined" results: ================== 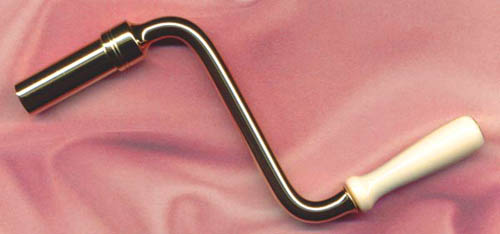 | |||
|
| Powered by Social Strata |
| Your request is being processed... |
Welcome Aboard IHC185™ Internet Horology Club 185 IHC185™ Discussion Site Main Page Technical, Shop Talk and Internet Links Horological Tools, Books and Miscellaneous When I was younger and dumber........
Technical, Shop Talk and Internet Links Horological Tools, Books and Miscellaneous ©2002-2025 Internet Horology Club 185™ - Lindell V. Riddle President - All Rights Reserved Worldwide
| View $GS_USERNAME's User Profile | |
| View Recent Posts by $GS_USERNAME | |
| Notify me of New Posts by $GS_USERNAME |