
| WWT Shows | CLICK TO: Join and Support Internet Horology Club 185™ | IHC185™ Forums |

|
• Check Out Our... • • TWO Book Offer! • |
Welcome Aboard IHC185™  Internet Horology Club 185 IHC185™ Discussion Site Main Page Technical, Shop Talk and Internet Links Watch Repair Questions and Answers Balance Staff Removal Instructions
Technical, Shop Talk and Internet Links Watch Repair Questions and Answers Page 1 2
Go | New Topic | Find-Or-Search | Notify | Tools | Reply to Post |
| IHC Life Member |
In response to a member question about removing balance staffs, I am attempting to address this question in more general terms. I must warn the reader that only "practice makes perfect" and with that I go on. Most staking sets made by K&D, etc. have with them some odd looking tools which are in fact at least 50% of the reason we use a staking set. These are Balance staff and roller removing tools and stakes. Some balance staff removal tools came with an instruction sheet that looks like this . . . 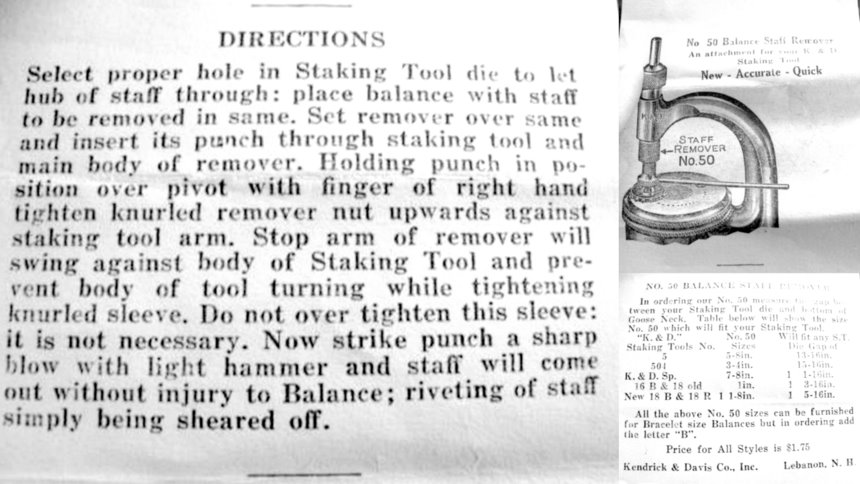 | ||
|
| IHC Life Member |
AFTER removing the Balance Hair Spring which can be done several ways, it is wise to locate from your staking tool set those tools necessary to complete the removal of; 1. The Safety Roller(s) 2. The Balance Staff 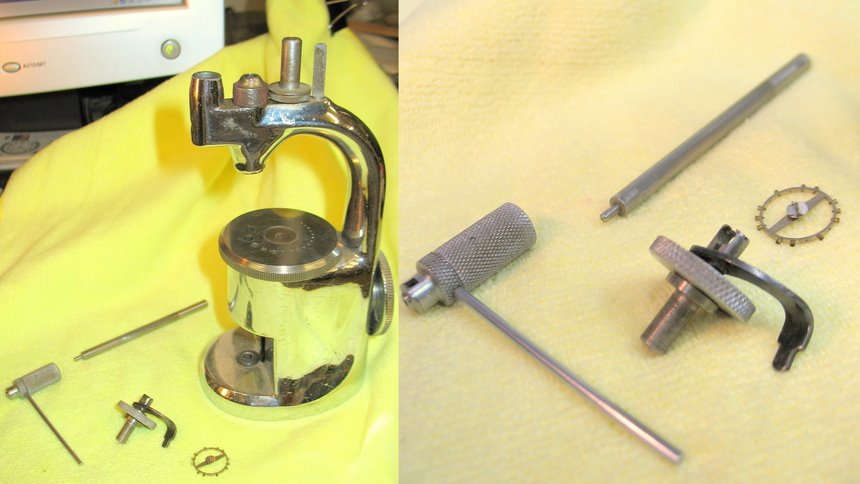 | |||
|
| IHC Life Member |
First, You install the Roller Removal tool in the largest hole on the staking tool set aligned properly so that by using the right stake you can gently tap out the roller(s) being careful not to break off the Roller Jewel. 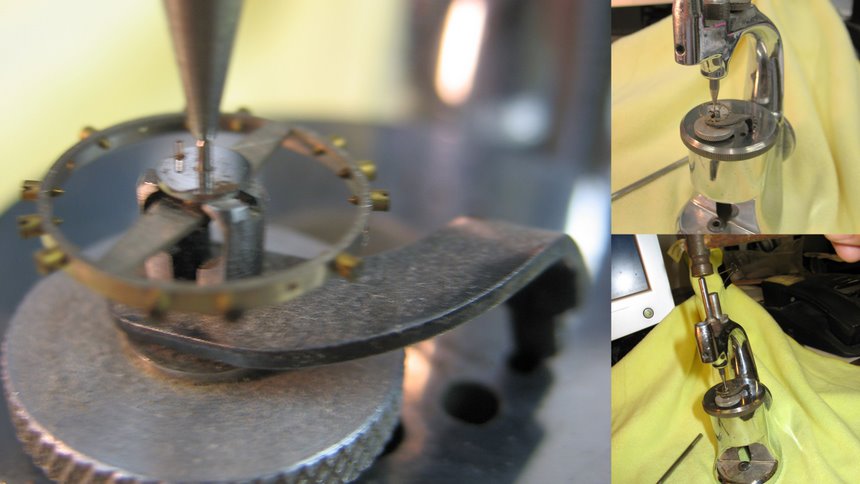 | |||
|
| IHC Life Member |
Then according to the balance staff remover instructions shown in the first part of this above( Briskly tap the removal tool punch with a brass hammer to knock out the staff. you CAN remove the staff the same way without this tool, but you will llikely damage the balance wheel by bending the cross arm. 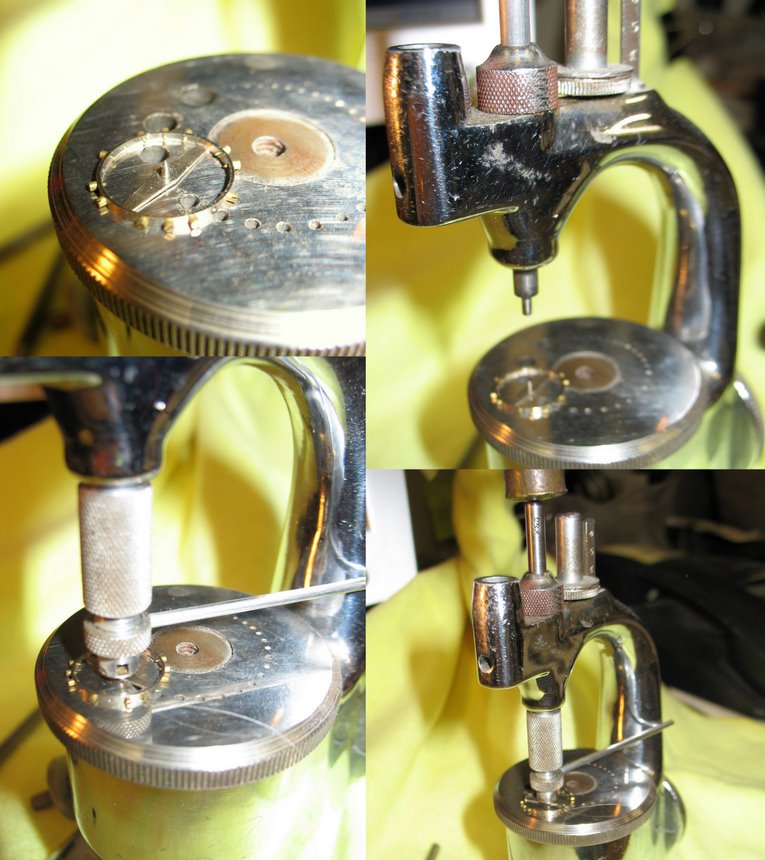 | |||
|
| IHC Life Member |
If you have done all of this carefully, you should have a good wheel ready for re-staffing, and a good safety roller(s) for later assembly and restoral of the watch. For this demo, I used a swiss fake wheel of no value so no live Balance staffs, wheels or rollers were injured or killed in this exercise. Putting in the new staff is covered pretty well in "The Watch Repairer's Manual by Fried, and the Chicago Horological school books 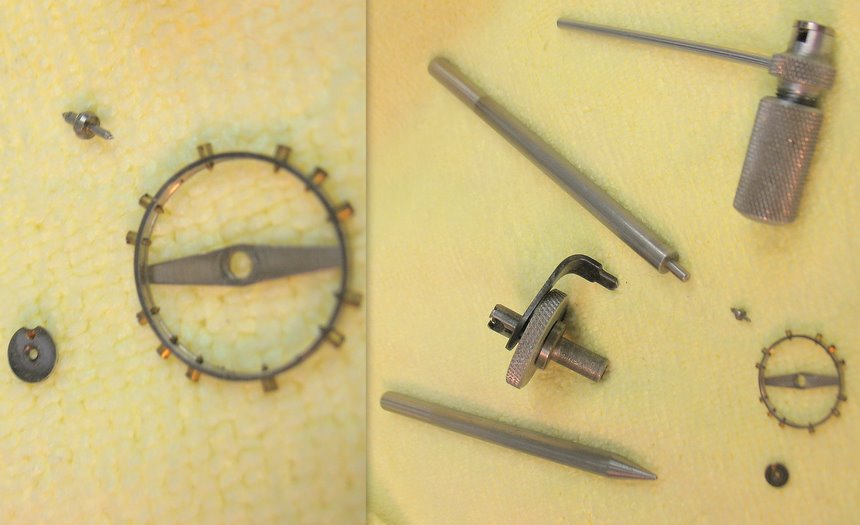 | |||
|
Thanks David for the tutorial. What I was afraid of is if the staff is friction type, I have no worry of enlarging the hole in the balance. But if it riveted won't it enlarge the hole in the balance? I've removed a few broken staffs and have installed a couple successfully. They were just 6s Elgins I had laying around for practice. THEN I heard about the riveting the staff. NOW I am worried about ruining a good balance on an Illinois which would be hard to replace. If you have more to caution me on, I would really appreciate it. Thanks Bill Vaughan | ||||
|
Bill, If it's a riveted staff, it's best to cut it off. | ||||
|
| IHC Life Member |
I agree that the best method for removing a riveted staff is to use the lathe to cut away the hub. The instructions provided say that the rivet will simply be sheared off. Yes, the wall of the balance wheel hole will be the shearing "tool" and I don't see how distortion of some kind can be totally avoided. Thanks David for sharing the procedure for the use of the tool. I'm sure we all have our preferred methods of doing various tasks. | |||
|
| IHC Life Member Watchmaker |
Caution, I just want to give fair warning, that if you are not proficient in lathe use and graver preparation, don't cut the rivet. The probability of damaging the balance is far greater in using the lathe if you don't know what you are doing, however, it is real quick compared to using the balance staff remover, and is the currently preferred method of the Swiss. Remember, if the balance is so easily distorted, then how come it isn't damaged when you stake the rivet down on it. That little hammer is like a wrecking ball when compared to the mass of your balance arms and the rivet on the staff. Make up your own mind here, but I have never seen one instance where there was damage to balance wheel when these removers are properly used. Usage of this tool is explained in detail by the late Henry Freid in "The Watch Repairer's Manual" and in the Chicago School of Watchmaking book and in the Joseph Bulova School of Watchmaking book. Point, try not to be a maniac with the hammer, and if you are using some sort of big hammer, get rid of it. Attached is a pic of my hammers. Compare to the size of a penny. The little one for bracelets and the bigger one for pockets. Technically they might be better to be brass, but I have developed a feel for these in getting the right amount of force. Like all tools, when using them correctly they are beautiful things,when used incorrectly, they damage the watch. Just a note, The modern Swiss manufacturers don't want you to remove staffs with removers, and to only use the lathe. The modern Swiss also are no longer providing staffs for many calibers and are requiring you to buy the part complete. I can only guess that they don't think watchmakers are capable of removing or putting a staff in their watches.  | |||
|
| IHC Life Member Watchmaker |
Something important to add to this. I was talking to a fellow IHC member who pointed something quite important out here. Although my reaction to the thread contained "before you cut the rivet," in reality nobody should be cutting off any rivets. The correct way to do this is to cut the hub off the staff and slide the balance wheel down off the staff. Cutting off the rivet and lifting the wheel off the staff is exactly how the balance arms get damaged. I still stand by the use of balance staff removers, if they are used properly. | |||
|
Good Day, Scott, et alii! Actually the preferred method, taught at WOSTEP and Swiss horology schools is grinding off the lower part of balance staff and most of the hub, leaving about 0.002" to 0.003" of it, to ensure that the balance does not get damaged in any way. The remains of the balance is driven out in a special staking frame, by breaking off now very thin remnant of the hub and deformed part of the rivet is driven away from the balance seat not in any way damaging it. The grinding is done in a small mains operated grinder, which comes with the special staking frame. The tool used to be distributed by Bergeon and is named MOLFRES, Bergeon part #5478. The grinding part of the tool is a carborundum wheel, much like the small cut off wheels used on Dremel tools. The whole process is very fast and generally takes no more than thirty to forty seconds to safely remove broken staff without in any way damaging the balance. No force of any kind is applied to it. Just a very light tap of a brass hammer on a punch when braking off the hub remnant and at the same time the upper part of the staff is driven out. The images below are of the Molfres grinder and the accompanying staking frame. BTW, Henry Hatem told me that the same technique is taught as preferred one in US horology courses supported by WOSTEP. Cheers Dushan      | ||||
|
Dave, Thanks for the tutorial. Where can I purchase the tools you have pictured in your tutorial? I have an old staking set, but it does not include any of the ones you pictured. | ||||
|
| IHC Life Member |
Sorry, I never saw Ken's Question. All the stuff I have gotten for my work came from eBay | |||
|
Thanks Dave for responding. SInce I last posted, I purchased everything I need for the process....except the courage to begin. I have several Elgins in great shape with the exception of broken staffs. THey are waiting for me to bring them back to life. Not sure what the heck I am afraid of. I have an even greater fear of replacing a staff, which I need a tutorial for to be sure. Any tutorials and or suggested place to find parts? Deeply appreciated | ||||
|
While replacing the staff seems to be the major part of the job the balance should be trued and the poise at least checked before you re-install it in the watch. Regards, John | ||||
|
Great pictures - David!!! | ||||
|
One thing I always do is get the stakes to replace the staff ready before even removing the old one. I then use the flattening stake to line up the balance that is sitting in the hole on the anvil. I then put the remover on using the stake to align it before tightening it. This way the punch will hopefully hit the old staff centered and the staff should come out strait. I dont seem to have as much of a job truing the balance afterwards if I do this first. | ||||
|
| IHC Member 1613 |
The way I was taught to change a staff is the way Dushan mentioned above..I have never seen the tools he has pictured but this method works well for me.. | |||
|
| IHC Life Member |
Thanks Gary, I second the motion. Almost any book will show how to remove a staff but they are all buy cutting it out with the lathe. When you force a riveted mass through it's hole you have to be enlarging the hole. The staff is of harder material than the cross bar. | |||
|
I see no real difference between the grinding method and the k&d removal method. Both are forcing the staff out past a small amount of metal. In the k&d method the very tiny amount of metal is the amount the riveting stake puts over the arm on the top side. The from the bottom its the remainder of the balance staff that is left after grinding. How does it prevent bending of the balance wheel when you are basically doing the same actions? | ||||
|
| IHC Member 1613 |
Jim, I am not saying this method is better that the one you use...I am saying this is what I learned and it works well for me..I very seldom get a distorted balance wheel..I grind the hub down until there is almost nothing left of the hub...Then I tap it out from the underside of the balance..The body of the staff will break away from the hub and the small (looks like a washer) part of the hub is left on the under side of the balance..I think a person should use whatever method works for them... | |||
|
I am not debating what way is better Gary. I understand its what you learned.I am questioning if there is really any difference at all. The question I have is a comparison between your method and the k&d removal tool. Isnt it basically the same thing just from a different side? 1. Both methods cause the staff to be pushed out of the arms. 2. Both methods have a ring of metal that hold the staff in that is not removed.
3. The staff is forced out in both methods. What are the advantages of one method over the other? Isnt the ring that isnt grinded away thicker than the tiny amount that is on the riveted side? | ||||
|
| IHC Member 1613 |
Jim, I understand what you are asking...The part of the hub that is not ground off does not go thru the balance arm, it actually is ground down so thin it just breaks away from the part of the staff that goes thru the arm when tapped with the hammer and stays on the lower part of the balance wheel..Actually sometimes I can just push the staff out by hand on my staking set....Usually what is left of the hub looks like a very, very thin washer..The next staff I do I will try to get some pictures and measurements... | |||
|
Gary, what do you use for your grinding? Regards Peter in Oz, enjoying the discussion of alternative methods | ||||
|
| IHC Member 1613 |
Peter, I don't use anything fancy just a dremel tool and a cut off disk..You just have to be careful not to hit the balance arm with the disk... | |||
|
Here is a model I created in a few minutes to help with my questions. I just tend to try and think through mechanical actions and cant quite see the difference in the methods or why one would lessen the possibility of warping the balance wheel. Even if I can grind away all of the hub to match the small rivet that is created over the hub arm. I think that would be hard to do without damaging the arm, but lets say its possible for the sake of discussion. There is still material that is over the arm on the hub side. You are still going to have to force the remainder of the staff that is in the arm. If I force the remainder of the staff out from the rivet side, I am forcing it through the arms also. In both cases there is a amount of metal over the arm. Is there any real difference in what side I punch it out from? Isn't it still the same mechanical operation of forcing the staff out even though some metal overhangs? Now lets consider the amount left on the hub side. Isn't it a larger surface? The hub is wider than the rivet, correct? But even if its the same size, is there an advantage to which way the staff is punched out? 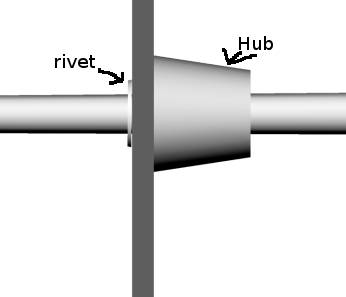 | ||||
|
If it was possible to measure an installed staff, the od right behind the rivet and the od right in front of hub, I would think the hub end is smaller. When riveting a staff the entire length of this area would not expand equally due to its hardness. Therefore it would be better to take the hub. Even if rivet is cut with lathe there is some expansion that must be forced through. Just my opinion | ||||
|
In order for the riveting process to create tapering shape there would have to be a tapering hole in the balance arm. I just looked at a 18s waltham 1883 balance wheel that had the staff already removed. The hole looks to be the same size all the way through. Granted thats only one, perhaps others can check. Even if there was a tapper created wouldn't that be offset by the force needed to overcome the difference in diameter of the rivet vs the remaining hub? Also are we wrongly assuming that the distortion of the balance wheel/arms is done in removing the staff and not in installing the new staff? Is it possible that during the install of the new staff it is installed tilted or the arms bent at that time? | ||||
|
| IHC Member 1613 |
Jim, I had to do a staff on a Hamilton 992 today...I took a few pictures as I was removing the old staff..Picture #1 Balance before I started. 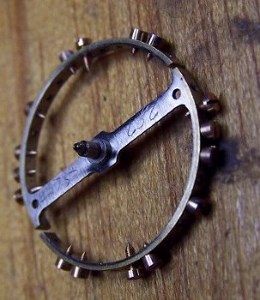_(346x400)_(346x400)_(303x350)_(260x300).jpg) | |||
|
| IHC Member 1613 |
Staff after I ground the hub off..More pictures on the next page.. 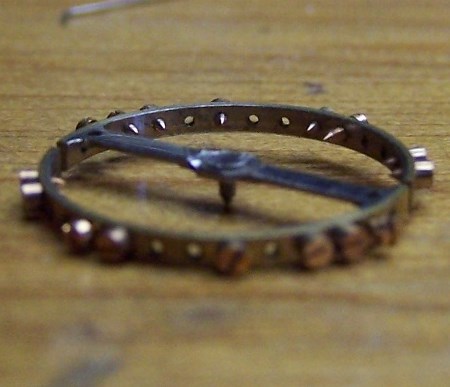_(2).jpg) | |||
|
| Powered by Social Strata | Page 1 2 |
| Your request is being processed... |
Welcome Aboard IHC185™ Internet Horology Club 185 IHC185™ Discussion Site Main Page Technical, Shop Talk and Internet Links Watch Repair Questions and Answers Balance Staff Removal Instructions
Technical, Shop Talk and Internet Links Watch Repair Questions and Answers ©2002-2025 Internet Horology Club 185™ - Lindell V. Riddle President - All Rights Reserved Worldwide
| View $GS_USERNAME's User Profile | |
| View Recent Posts by $GS_USERNAME | |
| Notify me of New Posts by $GS_USERNAME |