
| WWT Shows | CLICK TO: Join and Support Internet Horology Club 185™ | IHC185™ Forums |

|
• Check Out Our... • • TWO Book Offer! • |
Welcome Aboard IHC185™  Internet Horology Club 185 IHC185™ Discussion Site Main Page Technical, Shop Talk and Internet Links Watch Repair Questions and Answers Lathe Choices/accessories & tools. More added 04.13.14
Technical, Shop Talk and Internet Links Watch Repair Questions and Answers Go | New Topic | Find-Or-Search | Notify | Tools | Reply to Post |
| IHC Life Member |
04.06.2014 Because this is educational for me to read, and I retain better if I write it down I feel that others may enjoy it also.(Disclaimer) Although I have 7 years of higher education, I still make plenty of mistakes. There are no guarantees as to the accuracy of the material. This information comes from a 1952 publication updated in 2010 and reprinted in 2012. It is only as accurate as the Author's research. This reading and most others compiled after 1950 use the Webster-Whitcomb 8 mm lathe as a standard. I recently purchased a NOS, Lorch, in the box with all the attachments. It is a beautiful piece of equipment, with all accessories but it’s not for me. It only took two weeks to discover that it is an overkill for the average watchmaker. I spent more time putting it together, and then re boxing it than using it. It’s performance was that of a standard watchmakers lathe. It is on its way back to the seller and I am again using my combination of America Watch Tool Co. lathe bed with Webster – Whitcomb Hard, Head & tail stock with a flip over tool rest. and a chrome, Racine, Counter balanced lathe motor. Counter balanced meaning it has a weight on the vacant (Non pulley) side of the Motors main shaft to counter act the weight of the belt driving pulley. It also acts as a little flywheel to increase the torque of the motor. The Con being it will breeze through most jobs but if slowed down takes a moment to get back up to speed. A great deal has been written about the watchmakers lathe and it’s uses. Every watchmaker as well as the student accepts the fact that the lathe is a important piece of equipment. And the variety of the jobs one can do with it only depends on the accessories one purchases. Each Manufacture claims to build the finest & best equipment. Advertisements are replete with beautiful pictures and gorgeous women. I never did figure out what the bikini was for, other than to distract the machinist. These may or may not be faithful portrayals of the actual tool. There is then the need for study of the lathe from the standpoint of its actual construction rather than its uses. Basically the lathe is for turning. The object to be turned must be held tight. Any springing, looseness or chatter will ruin the project. Chatter has a very deleterious effect on tool life. Today, almost all leading manufactures of watchmakers’ lathes produce them to the standards of WW. (Webster – Whitcomb) What are these standards? A standard WW lathe has a 50 mm (1.394 in) center height, 60° Deg. Angular bed ways, 1.456 in. width on top of the bed, an 8 mm chuck body and a 40° included angle on the chuck. There are other dimensions involved too but these are the principal ones. So if you are looking for a lathe be sure to purchase one with the above dimensions. The heart of the lathe is the Collet and the manner in which it is mounted. A collet must be hollow so that a wire chuck can be inserted at one end and draw bar for tightening at the other end. When a chuck is tightened and released it slides back and forth on the conical seat in the collet. Since this sliding takes place under great pressure, it is necessary to guard against undue wear at the contact points. The wear is minimized by making the collet of hard steel. You should watch and question the imports as to this fact. Some lathes with soft collets are still being made overseas. Some for sale in the USA, wither IHC or E Bay, have been used and the seat is worn enough to let the collet remain loose at the contact point. The simple question (Is the collet hard?) is not sufficient. Certain makers, in an attempt to economize, harden only the end of the collet and leave soft the entire back end. A collet should be hard for its entire length. Also thin wall collets are not acceptable. When pressure is put on the collet by tightening the draw bar the walls of the collet will buckle. In other words a lathe is only as good as the equipment used in it. Cheap, thin walled, used, and some foreign collets can make even the best lathes performance UN-acceptable. Many attachments, such as index plates, screw cutting attachments, lever operated chuck closers, etc, must be mounted on the rear end of the spindle. Unless the lathe manufacture provides fully hardened collets with extra length the watchmaker must forgo the possibility of using these attachments. Keeping the lathe oiled at the bearing cups on both ends and keeping the tail stock clean and lubed is always a good idea. BELTS Just because a belt fits in the groove does not mean it will perform well. The “V” in the pulley is roughly a 53° angle and is most desirable. Some lathe heads had a 90° V in the driven pulley. To tell what you have, lay the corner of a ruler in the groove. If it fits good you have a 90° pulley. If it is a sloppy fit you probably have a more desirable 53 ° pulley. 90° turned out to allow for too much slippage. If you belt* rides in the bottom of the groove it will slip. If your belt rides above the bottom of the groove but not at the top of the small side of the groove tip it will pull with minimum slip. Adjusting the motor to get the belt tighter can actually cause it to slip by pulling it to low in the groove. *This is speaking of the round belt. I am not yet aware of a V belt for these lathes. Although V belts can be obtained they are not recommended for the late. Thus it is important to obtain the proper size diameter belt when shopping for a new one. The pulleys can be changed to the 53° pulley without having to change the entire headstock. The headstock is dismantled and a new pulley inserted. Although there does not seem to be any particular order of re assembly there are grooves that must be lined up for a proper fit. These pulleys are made of a phenolic & Linen based material which is extremely strong and impregnated with Bakelite. I once ordered a pulley and it arrived in the wrong V groove pitch and was made of Mexican Iron Wood turned to shape on a lathe.. I don’t know about the quality of such an item. So I sent it back. And super glued my old one together and it still works OK today, 2 years later. BALL BEARINGS If your lathe is of the opposed bushing style you have a good old pre 50’s near, indestructible unit. In 1952 the ball bearing lathe was introduced to the public and it had very good results in sales, although it did not perform any better or run any truer than the bushing unit. In fact the bearings tended to get dirty and grind and on occasion a lathe would break a bearing and render itself useless. It is my humble opinion that the opposed bushing lathe is the most problem free unit of the bunch. Even in the late 50's and 60's some of the old timers knew this and purchased their preferred, busing style lathe. Under a load the balls in the bearing cage deform. This can cause the lathe to by right on, on one side of a pivot and off on the other. There are no preloaded bearings to wear and get out of adjustment. You basically don’t have to do anything to it except use it and put in a little oil once in awhile. These bushings lathes do not vary in tolerance. CHUCKS Although covered a little on the first page, A lathe is useless without good chucks. (Collets). All Chucks are split. Of all the accessories the chuck is the most used and the most abused. Good chucks should be taken care of, not thrown in a box with the rest of the stuff. This goes for gravers too keep them individually packed so they don’t dent the cutting edges. A piece of wood, drilled with the proper size holes and the proper depth will do the trick. If you have a object in the chuck and it just won’t run true, although the chuck looks to be spinning OK, you should probably trash the chuck and try another. Split chucks allowed to be maltreated become bruised and the prongs forming the chuck do not close evenly. There is no adjusting it. It is wasted. one prong is making contact before the other two. Check the outer diameter of the inner slope (Bell)on the head of the chuck. If it looks questionable, don’t purchase it. Be sure it and the headstock receiver are squeaky clean. Crawford’s, formerly the principal UK maker of split chucks ceased production 5 years ago in 1945. Overleaf is a chart issued by Crawford’s showing the different characteristics of many watchmakers charts. For this session we will stop at Wax chucks. Pictures included separately. Press CTRL and roll your mouse wheel to enlarge the Print. E Bay chucks can be absolute junk, you won't know until you get it in the mail. Therefore make sure it is returnable and get the seller to inspect it if they will, an guarantee it is good. As you can see from the, “ To use the split chuck” below, it is very important to find the proper chuck for the job. Just because you can force the item into the chuck does not mean it fits or will work. Look at the pictures and try to understand the proper fit. Hole too large, or hole too small. Never force the prongs open as this will spring the collet. The work should just fit in the collet, with a little drag. Insert the work into the collet and the force needed to tighten the draw tube should be minimal. Never wrenched or screwed up as tight as possible. To be continued--------- | ||
|
| IHC Life Member |
Collets  | |||
|
| IHC Life Member |
Collets 2 04.10.14 Wax chucks. Made from brass they come in various sizes, sometimes called wax brasses, their use is for the work to be able to be cemented on to the chuck when it is not possible or convenient to hold the work any other way. Secure the chuck in the lathe then heat the end of the chuck with clean smokeless heat. Use just enough heat to melt shellac. Use a thin layer. Too much shellac could cause the workpiece to settle more on one side than the other, making it impossible to run true. A picture is posted on how to true up the work on the wax chuck using pegwood. Step Chuck This is one of my favorite chucks. It has many uses but the primary use is to hold work of a circular disc nature, such as a wheel, gear or barrel. They come in 5 sizes, 2 mm apart from 5.4 mm to 23 mm. Care in selecting the correct chuck is important. The same care is to be taken with these chucks as is with the split chuck or any other type of chuck. STEP RING CHUCK The split ring chuck is similar to the step chuck but reversed. The steps being on the outside rather than the inside. When drawn tight on the headstock the prongs expand or spread outwards. Used to hold work of a ring nature, such as the MS barrel or a bezel, etc. they also come in 5 sizes of 2 mm graduations. UNIVERSAL CHUCK These chucks come in two different styles. They can be used to grip work internally as with a disc or grip externally by reversing the jaws. One style has a key to tighten work and the other uses a knurled knob on the outer perimeter to tighten work. They come in 3 and 4 jaw versions. Both can be used as step ring chucks for large work. BRASS SPLIT CHUCKS Sometimes referred to as jewel chucks. They are small brass chucks to be inserted into a steel split chuck of # 50 with a hole or bore from 0.20 to 0.32 mm. Made in sets of 20 with 5 mm dia. body Used for turning very small parts where the portion to be griped is delicate, such as the thread of a jewel screw. To be continued..... 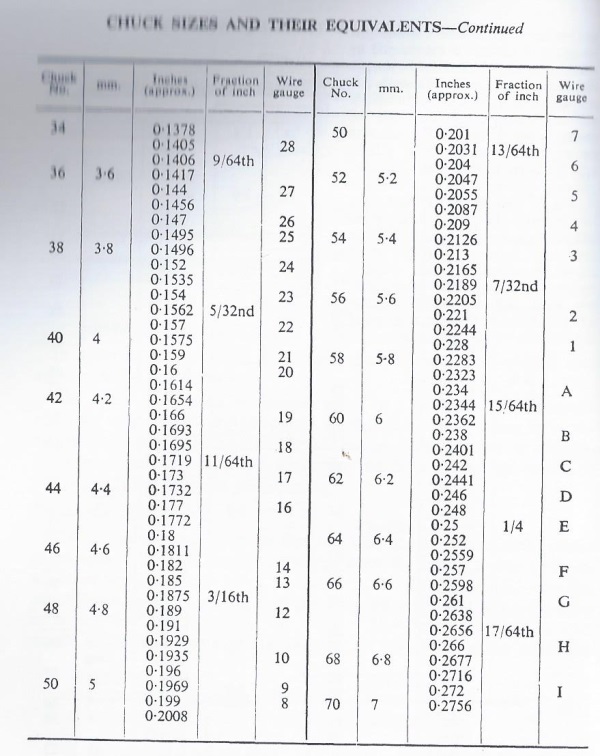 | |||
|
| IHC Life Member |
Belts 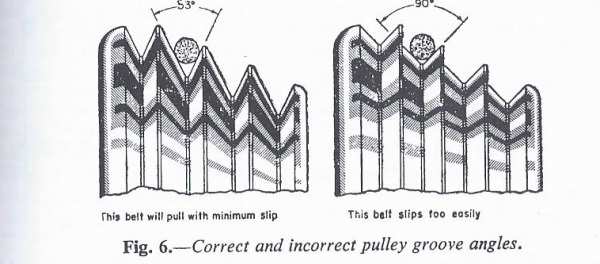 | |||
|
| IHC Life Member |
Collet fit, See above.. 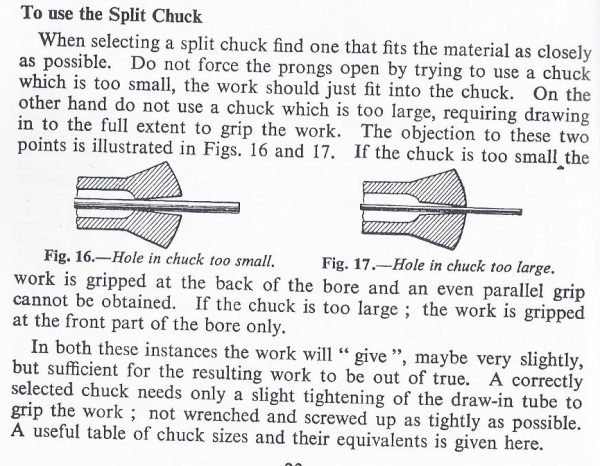 | |||
|
Right up my alley, Patrick. All appreciated. I've seen other interesting discussion in a video about lathe types and history. The more knowledge, the better. kh | ||||
|
| IHC Member 43 |
very good read,good information, Thanks Patrick. Curly | |||
|
I am glad I read it. Makes me appreciate the lathe I already own. The info about collets was great. Karim | ||||
|
| IHC Life Member |
More on chucks. 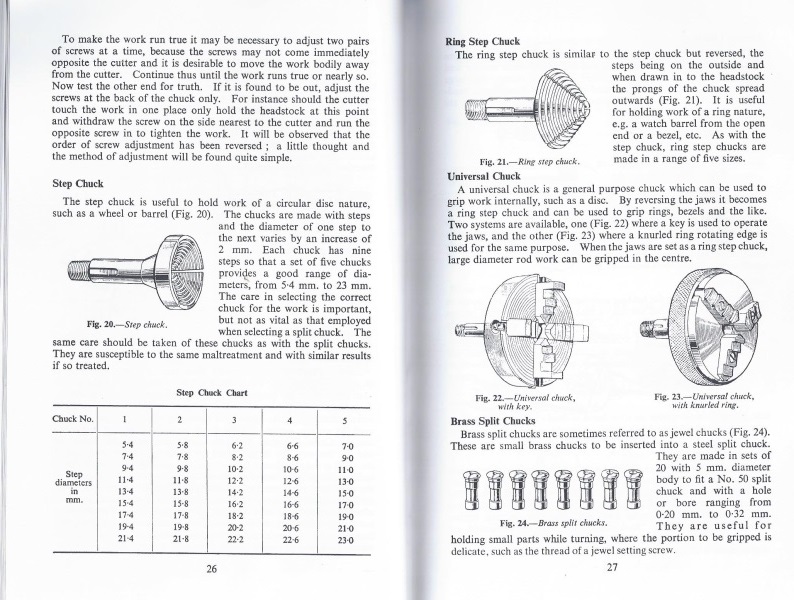 | |||
|
| IHC Life Member |
Chucks 1 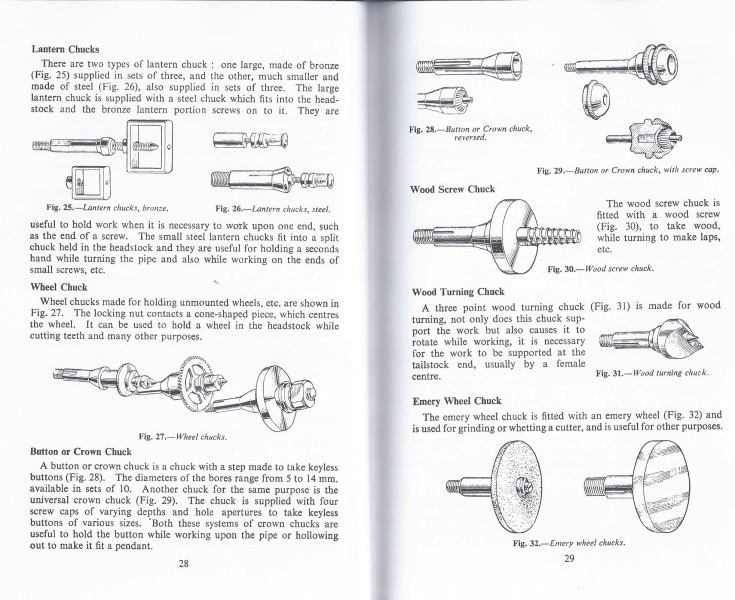 | |||
|
| IHC Life Member |
Chucks 2 I have a drill chuck that will go down to 0, so I can use it on staffs and pinions. I've had it for a year now and had to speak Chinglish several times to get them to make it right but finally got a very good unit. I'm very happy with it. First it was the wrong threads then the second time it would not close all the way and the third time he got it right. God I hate language barriers. It's not a Jacobs but it works just like one. 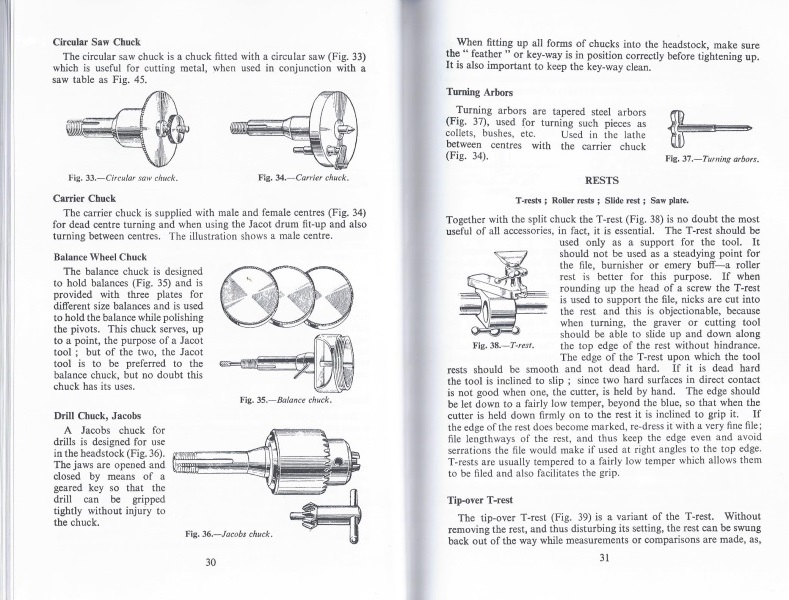 | |||
|
| IHC Life Member |
T rests Together with the split chuck the "T" rest is an essential item. There are fixed 'T' rests and flip over "T" rests. The flip over is nice because you can flip it out of the way and keep working on your project. Both will preform the same way and hold your tool the same. It should not be used as a steadying point for a file, burnisher or emery buff-A roller rest is better for this purpose. If when rounding up the head of a screw the "T" rest is used to support the file, nicks are cut into the the rest and this is objectionable because when turning the graver or cutting tool it should be able to slide up and down along the top edge of the rest without hindrance. The edge of the "T": rest should be smooth and dead hard. If dead hard the tool is inclined to slip. Keep the edge dressed with a fine file. "T" rests are usually tempered to a low temper. I mentioned a roller rest. There are two types of roller rests. a single and a double. The Double is capable of filing dead flat surfaces. Next lesson will be on the slide rest of various designers. | |||
|
| Powered by Social Strata |
| Your request is being processed... |
Welcome Aboard IHC185™ Internet Horology Club 185 IHC185™ Discussion Site Main Page Technical, Shop Talk and Internet Links Watch Repair Questions and Answers Lathe Choices/accessories & tools. More added 04.13.14
Technical, Shop Talk and Internet Links Watch Repair Questions and Answers ©2002-2025 Internet Horology Club 185™ - Lindell V. Riddle President - All Rights Reserved Worldwide
| View $GS_USERNAME's User Profile | |
| View Recent Posts by $GS_USERNAME | |
| Notify me of New Posts by $GS_USERNAME |