
| WWT Shows | CLICK TO: Join and Support Internet Horology Club 185™ | IHC185™ Forums |

|
• Check Out Our... • • TWO Book Offer! • |
Welcome Aboard IHC185™  Internet Horology Club 185 IHC185™ Discussion Site Main Page Horological Discussions, Questions and Answers Pocket Watch Discussions Is this a Hamilton 522 Dial?
Horological Discussions, Questions and Answers Pocket Watch Discussions Go | New Topic | Find-Or-Search | Notify | Tools | Reply to Post |
IHC Member 1610 |
Is this a Hamilton 522 dial? I am listing this in the wanted section but I want to make sure I am asking for the right piece. Thanks Harry 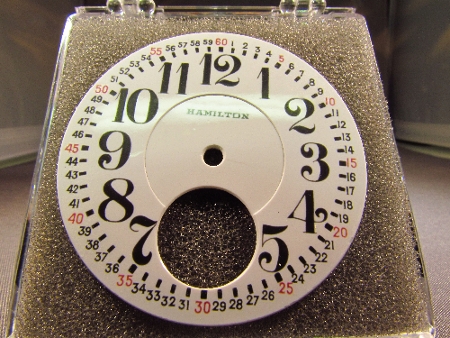 | ||
|
| IHC Member 1291 |
That is the 522 dial. It will require a seconds bit with the very small numeral "6" to be below the hole for the pinion, to be a correct example. You should be looking/advertising for a busted 522 dial, but one with a good seconds bit. Once you find and procure one, I'm sure someone will help you with technical help in removing and installing the seconds bit. This is not an easy task, it requires a thorough understanding, and to be correct and problem free, some dexterous skills and a soldering iron. Even then an attempt often will put a hairline in the new seconds bit from force and/or heat. If one attempts to glue a seconds bit in, it will not withstand a very rigorous cleaning, solvents, heat, years, or a vibrating cleaning machine. One often will also attempt to use too much glue which will ooze up onto the markers and/or onto your fingers and the dial will be left with a "print" on in or around the general area. Then are you going to be able to sell the watch at some point, without pointing out a glued in seconds bit, in case it is forgotten, only to have someone call your hand at a later date when the dial is removed or cleaned Last point : Dials and dial making materials made on different days, different years, and exposed to different lighting conditions, cleaning, usage, carry, and storage, throughout it's tenure will have different shades of colors imparted to them. Generally they won't be noticed unless/until someone makes a swap out of one of the 3 components on a DSD [ outer chapter/inner chapter/seconds bit], then the changed piece will stick out like a sore thumb or a fat tick on a skinny dog Just food for thought as to what one will actually have without a professional soldered in job and what is required to accomplish a professional job............ regards, bb | |||
|
| IHC Life Member |
Harry if you can find someone to resolder the seconds bit I have a dial like it with damage to the edge and someone cut the feet off but the center section and the seconds bit is good I will post a picture in a bit. Need to go grill dinner | |||
|
| IHC Life Member |
It should look sort of like this one, but you might be well to measure the seconds chapter hole size of your dial. If it were me, I would take Rob Jones up on his trade offer. 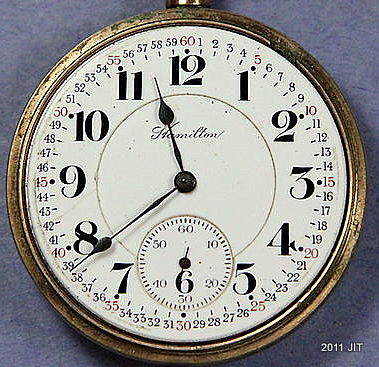 | |||
|
| IHC Life Member |
Harry here is the dial I have just like yours with a good seconds. Let me know what you want to do. Does your dial have all the feet. Dave I imagine being the same dial the seconds bit would be the same size wouldnt it?? 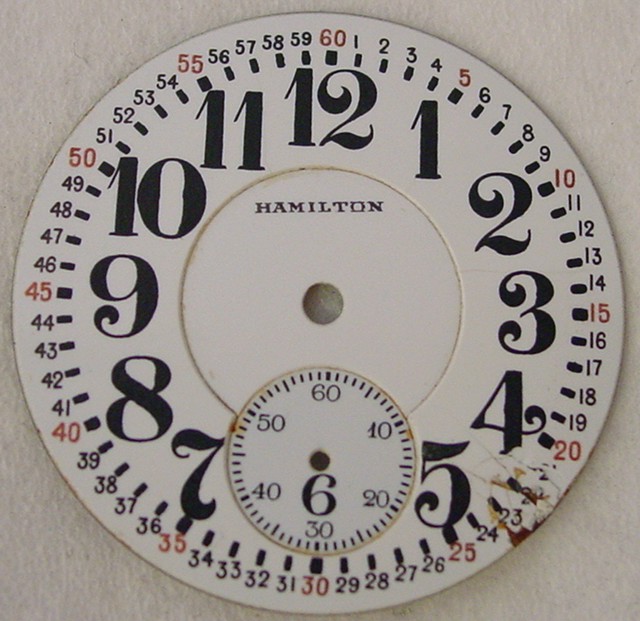 | |||
|
I'm happy this thread was brought up today. I just happened to be playing around with soldering dials back together today. I had some crappy DS dials to play with. Here's the plates before soldering. You'll notice that I have removed all old solder that I could and have re-exposed the copper on the plates. 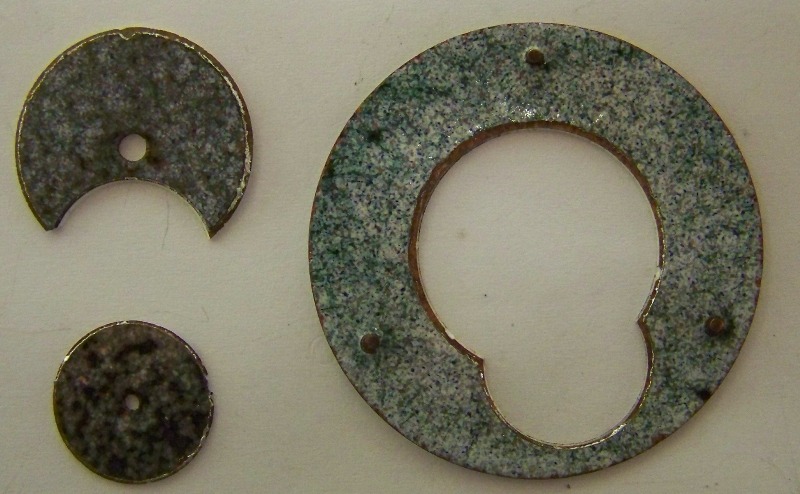 | ||||
|
And here it is re-soldered together. it took about 30 minutes to do the center. the seconds bit is very difficult to do and took me longer. I am going to have to come up with some way of easily shimming it to the right height while soldering it in place and not over heating the center sunk area. A single sunk dial wouldn't be as difficult. 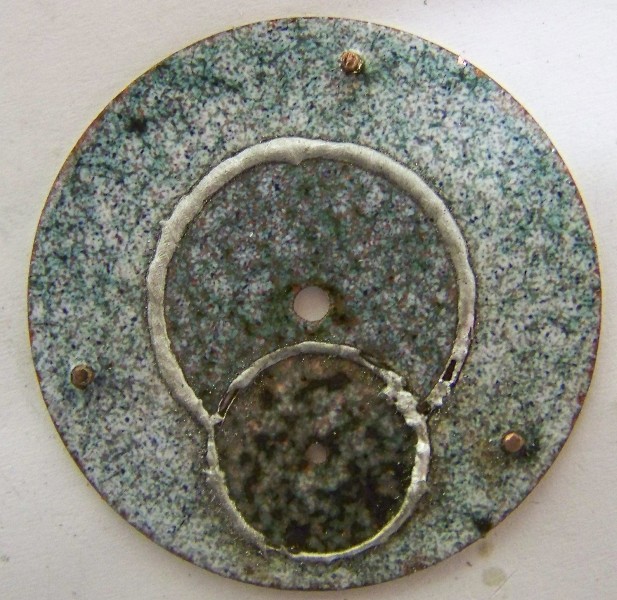 | ||||
|
To say the least I'm going to buy a large batch of damaged dials and keep practicing. I hope to be able to do these repairs at some point in my life. | ||||
|
| IHC Life Member |
Ed Shor sells low temp solder for just that purpose. Do the Hi Hemp large parts and then set in the seconds and lo temp it. | |||
|
David- I actually used the "Tix" solder. Even with cleaning the copper surfaces, the solder wants to run to a puddle since there is not enough copper surface for it to adhere to. I had to help it flow around the gap. It has been a learning experience to say the least. Not quite the same as soldering a copper pipe joint. Thanks, Jared | ||||
|
Just saw your comment about the high temp on the center area followed by low temp on the seconds bit. That would probably make it easier to do. I may have to play around with that too. Jared | ||||
|
| IHC Life Member |
Looks good Jared keep practicing and you will have them looking factory soon. Did you use a jewelers torch or a iron to solder. Also did you use the same tool to remove the old solder to take the dial apart. | |||
|
Rob- Thanks to Walmart I bought a mini butane torch made by 3M for $14.88. I used it for both removing most of the old solder and doing the new soldering. The biggest thing I had to learn with it was how far to keep it away so that it would slowly heat the new solder and not just melt it all too quickly. I bought a ceramic soldering block on ebay a few weeks ago, which worked well as I was able to aim the torch onto it beside the area on the dial I wanted to solder and the heat would slowly work its way to the solder. That's where the seconds bit area became a problem after I already had the center bit done, I couldn't get back around it without melting what I had already done. David gave a good pointer above to use a higher temp solder for the center bit so I could work with a low temp solder for the seconds bit without much chance of damaging my work I already did. Jared | ||||
|
| IHC Member 1610 |
Buster you are always a wealth of information. Yes I had thought about gluing it and your right after a few years I would have forgotten all about it. Thank you very much for sharing your insight and knowledge. Dave you also make a good point and I can always count a a very thought out response and help from you also. Jared looks like you are learning a pretty good skill. Looks good to this novice anyway. Rob thank you very much for both offers. I see you live in Cleveland. I have a friend that lives in Cleveland maybe you know him, Steve Wagner? I looked at the dial and I do not see any chips or hairlines. A few very very light scratch marks if you want to call them that and that is with a opti-visor. The back is missing two of the three feet. It has the 57 foot. So with this info let me know if both offers are still on the table. I am leaning towards the swap and let you try to fix it as Dave suggested. Thanks, Harry | |||
|
| IHC Life Member |
Cool Jared makes me want to try it now. Is the ceramic plate to help keep heat from the front of the dial. Wonder if you could use a flameproof wet rag to lay ove the top part to keep the center solder in place while you solder the seconds bit. | |||
|
| Powered by Social Strata |
| Your request is being processed... |
©2002-2025 Internet Horology Club 185™ - Lindell V. Riddle President - All Rights Reserved Worldwide
| View $GS_USERNAME's User Profile | |
| View Recent Posts by $GS_USERNAME | |
| Notify me of New Posts by $GS_USERNAME |