
| WWT Shows | CLICK TO: Join and Support Internet Horology Club 185™ | IHC185™ Forums |

|
• Check Out Our... • • TWO Book Offer! • |
Welcome Aboard IHC185™  Internet Horology Club 185 IHC185™ Discussion Site Main Page Horological Discussions, Questions and Answers Clocks, Including 400-Day Discussions Kienzle clock identification
Horological Discussions, Questions and Answers Clocks, Including 400-Day Discussions Go | New Topic | Find-Or-Search | Notify | Tools | Reply to Post |
Hi all: Please help me date my Kienzle bracket clock. The movement bears the winged clock Kienzle logo with the number "22". The gong is signed Kienzle with a scene with characters on it. The case was originally a nice mahogany which someone painted a yucky brown. I would like to remove the paint with as little damage to the wood as possible. Any suggestions? The dial was replaced and I would like to know what the original looked like. Please help. The clock, in spite of its warts, is functioning nicely. Thanks for your help Pattye .jpg) | |||
|
Here is the gong for the clock. Pattye 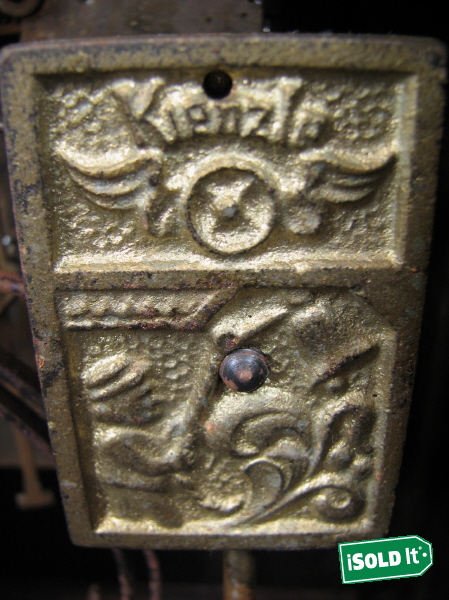 | ||||
|
I can't help date the clock but if you want to refinish it I would give the following advice. I am not a professional, just someone that likes to work with wood and refinishes clocks as part of my love for clocks. 1. Remove the movement and all metal and glass from the clock being careful to not damage the wood or the part. 2. Check the clock for veneer damage if you can. Some paint hides a lot of damage that will make your restoration job harder or make it hard to have your work look good when you are done. 3. Realize that the wood under the paint may not be of one kind. That will make it difficult to use a stain and may limit your paint choices. Manufacture's know the item will be painted and do not always use the best of woods. 4. Use a chemical paint stripper to remove the paint. 5. Get some wood that matches the type the clock is made of, this may require you to get several types of wood. Test any paint on this sample wood to ensure that it will look the way you want it to look when you are done. 6. After you have stripped the clock you may want to take it to a specialty wood store in your area to get recommendations on what would best cover the wood and/or other material the clock is made of. I recommend that you go slowly and don't be afraid to ask for help. Specialty wood stores usually have people that love this type of thing and will be more than happy to share their knowledge with you. Some Lowes and Home Depot have hobbyists that can help as well. Let us know how the project turns out. Rick | ||||
|
Thanks, Richard, for the detailed suggestions. The inside of the back door has a nice finish and does not appear to be veneered. I hope to find a solid wood case under that brown paint and not have to repair veneer or actually use paint. I had hoped to avoid the use of a harsh stripper and find the original finish underneath somehow. Is there any way to accomplish that? I tried the furniture masque sold on clock sites but it just cleaned up the present finish. I will keep you informed. Pattye | ||||
|
Pattye, I can tell you from my limited experience that Richard's advice is perfect, because the only real way to get that paint off is with a stripper, and trying any other way will only cause the wood to be damaged. I know, I have been there, and it is so much easier to just use the stripper and be done with it. Although the stripper is harsh, in the end, it gives you the best, and cleanest finish you can get, and saves you all the other steps that usually end with grooves and dents in the wood. You have a beautiful clock there, so I would go all the way with it. It looks worth the extra time and work to me. Good luck, and please keep us up on the finished work if you decide to do it. Sheila | ||||
|
Thanks for the encouragement, Sheila. I will be trying a stripper I purchased this week. Will keep you all informed. And thanks again, Rick, for the detailed instructions. Pattye | ||||
|
Pattye, I'd also echo what's been said already, I've restored a lot of antique furniture as well as clock cases, and chemical stripper is the only way to go. It's very possible that your clock is made of machine made mouldings rather than veneered wood, especially on the cap and around the door frames, so be wary of glued joints around the mitred corners, as the stripper and water may loosen them. Veneer will go up to an edge and be visible, so you could clean an edge first to check. You may also find small pins (nails) holding the mouldings, which were previously invisible due to colour of the laquer. They will need careful filling to hide them again as they may be rusty!. Any glue used on an old clock, is likely to be animal based glue, which is also sensitive to heat and water, and if separated, will either need to be cleaned off completely back to raw wood if refixing with modern glues, or well cleaned if re-applying period animal based stuff. It's Not a big deal, so don't let it scare you. Forewarned is forearmed! When you clean off the old laquer, you will have bare wood (hopefully), but the water you will need to use to clean it, will raise the grain of the wood into fine hairs. Let it dry totally, then sand over by hand using (dry) a fine glass, carborundum or alluminium oxide coated paper. You will have to sand it to remove the final stains anyway. When all sanded clean, gently wet the wood to raise the grain again from sanding, then when dry, very gently sand flat again just sufficient to remove the small hairs raised, and clean prior to varnishing - this will cut down the amount of grain (fine hairs) that will lift on the first recoat of varnish (and the angst felt when the 1st coat looks dog rough because of it!). For 1st sanding, I prefer to use 240 grit discs with an adhesive or velcro back as used by autobody refinishers, the grit on these is bonded to an acrylic backing so doesn't leave much grit behind like glass paper does - with so many edges on these things, just makes cleaning up before laquering easier! This type grit is coarse enough to shift grot, but fine enough not to leave deep scratches, the finer grit papers you use, the more glossy the final finish will be. There are a lot of edges to get into on those mouldings and will need thoroughly scraping to clear the gunge, you'll need to recoat locally with stripper a few times to shift it. I use narrow bladed wallpaper scrapers for this job - go gently and try avoid pushing the blade, it may dig in! - draw it and you'll be ok. Finally, beware when sanding the corners on a flat area such as the door frame, as you will be left with a cross hatch pattern that will be a pain to shift - go into a corner, but not across it and you'll be ok. Basically, never sand across the grain of the wood, go with it! Paint stripper! Please wear an apron and long rubber gloves when using this stuff, it's all acid based no matter how gentle the makers say it is. You will inevitably get splashes on your hands arms and clothing, and it will burn skin where it lands, so keep well covered, wear old gear and especially - Wear Safety Glasses - if it flicks into your eyes, you'll know about it for days!!!. Don't use those Latex surgical type gloves either, paint stripper burns through them without actually making a hole! - trust me, I know! Sorry it's a long reply, but hope it helps avoid some heartache and angst! Good luck cleaning up the clock, it'll be a beauty once done - hard and tedious work but well worth it! John | ||||
|
There are some paint strippers that can be washed off with mineral spirits or turpentine thus avoiding water. I did several pieces of furniture years ago and washing them with a cloth liberally saturated with mineral spirits to remove the stripper residue left after scrapping worked for me. Check your local library for a copy of "The Furniture Doctor" by George Grotz; he gives some good advice on refinishing wood. | ||||
|
Pattye, I'm really glad to hear that you are going to "Go for IT" and I would add, that you should read what John has written, it's just perfect! It sounds like a lot of steps, but when you have experienced doing it both ways, you will know why. It makes a HUGE difference! It's sounds a lot worse than it really is, because once you start to see some progress you can't wait to get the next step started. You can never let it dry too much, or sand too much. It is outstanding what you will have in the end, good luck, and I'm hanging in there for you. Sheila | ||||
|
Good advice from all. You will want to get a really good pair of rubber gloves - your hands will thank you. I would like to see the end result if you can share it with us. Rick | ||||
|
Thanks so much for all the advice. I can see that I have a lot of work ahead but hope to accomplish this project in this lifetime! You are all great to give such detailed information. I will keep you posted. Pattye | ||||
|
Be sure to post a photo when finished. I love to see before/after projects! greg | ||||
|
| Powered by Social Strata |
| Your request is being processed... |
©2002-2025 Internet Horology Club 185™ - Lindell V. Riddle President - All Rights Reserved Worldwide
| View $GS_USERNAME's User Profile | |
| View Recent Posts by $GS_USERNAME | |
| Notify me of New Posts by $GS_USERNAME |